Five9 VCC Setup for Voice Channel
Last updated: July 21, 2026
NOTE
Before proceeding make sure that the SFTP bucket folder name and tenant name are the same.
Overview
Connecting your Five9 Virtual Contact Center (VCC) to your Level AI account is a two-stage process that leverages Five9's Secure File Transfer Protocol (SFTP) upload capability and establishes a connection with Level AI's servers. This guide provides step-by-step details of the configuration process to help you enable the automated transfer of call recordings and metadata reports from Five9 to Level AI. Full documentation of the Five9 VCC is available here.
This integration allows for seamless data transfer, eliminating manual processes and ensuring Level AI has access to the necessary information for analysis and insights. On completing these steps, Five9 will begin to automatically upload your call recordings and associated metadata reports to Level AI, streamlining your workflow.
INFO
For details about the Five9 Chat/Email integration, please refer to 📄 Five9 VCC Setup for Chat/SMS/Email channels
Voice
IMPORTANT
Confirm with your Five9 point of contact that recordings are in Stereo.
Part 1 - Configuring SFTP Uploads in the Five9 VCC
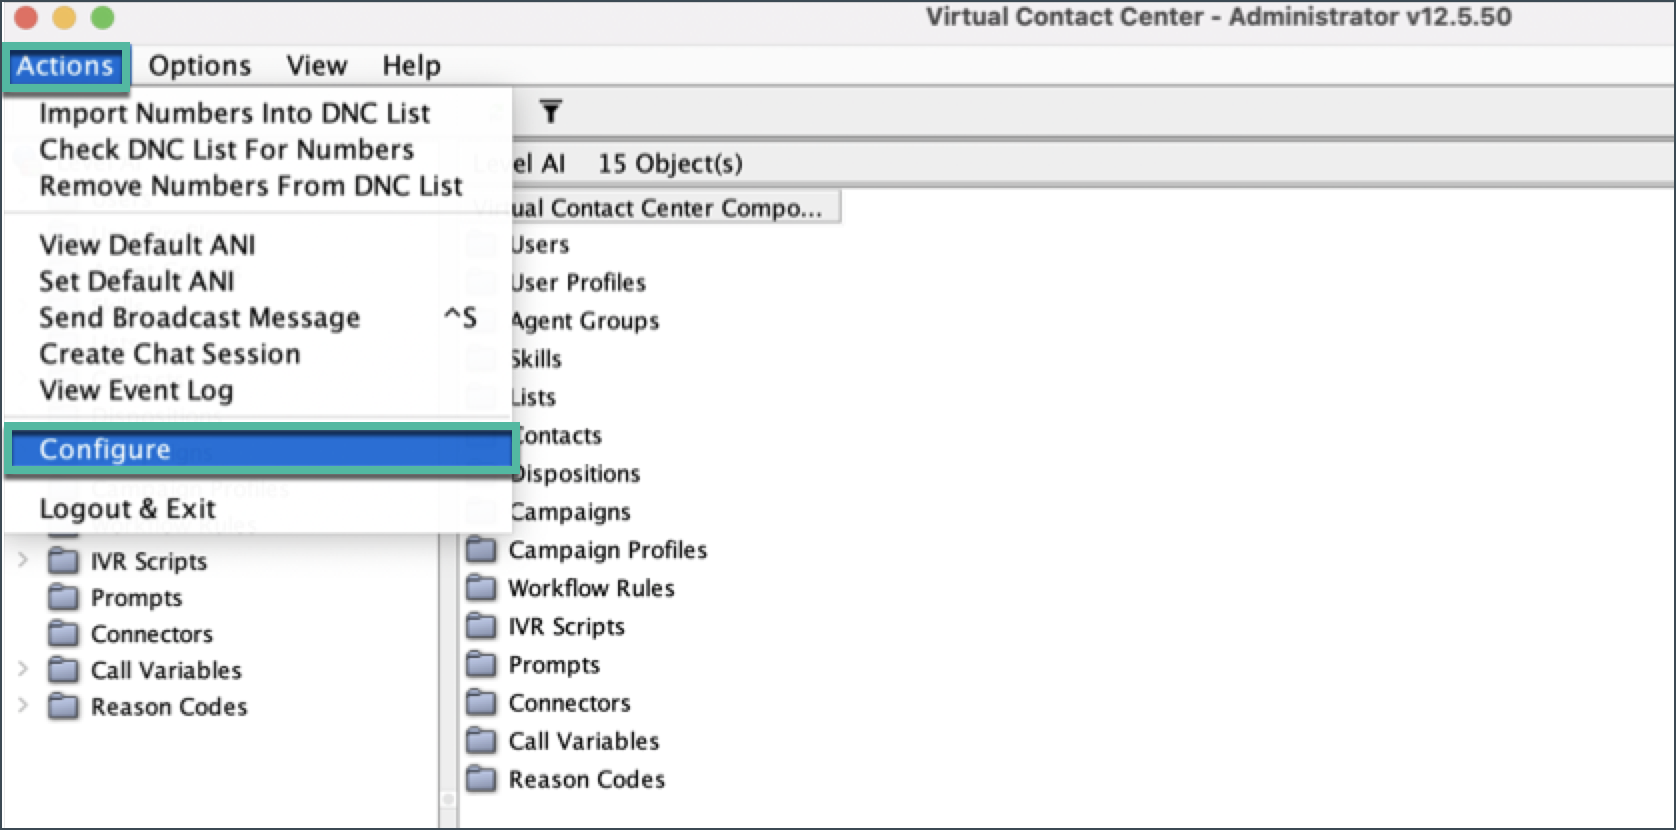
Login to your Five9 VCC - Administrator program. Click the Actions menu and select Configure to open your VCC Configuration screen.
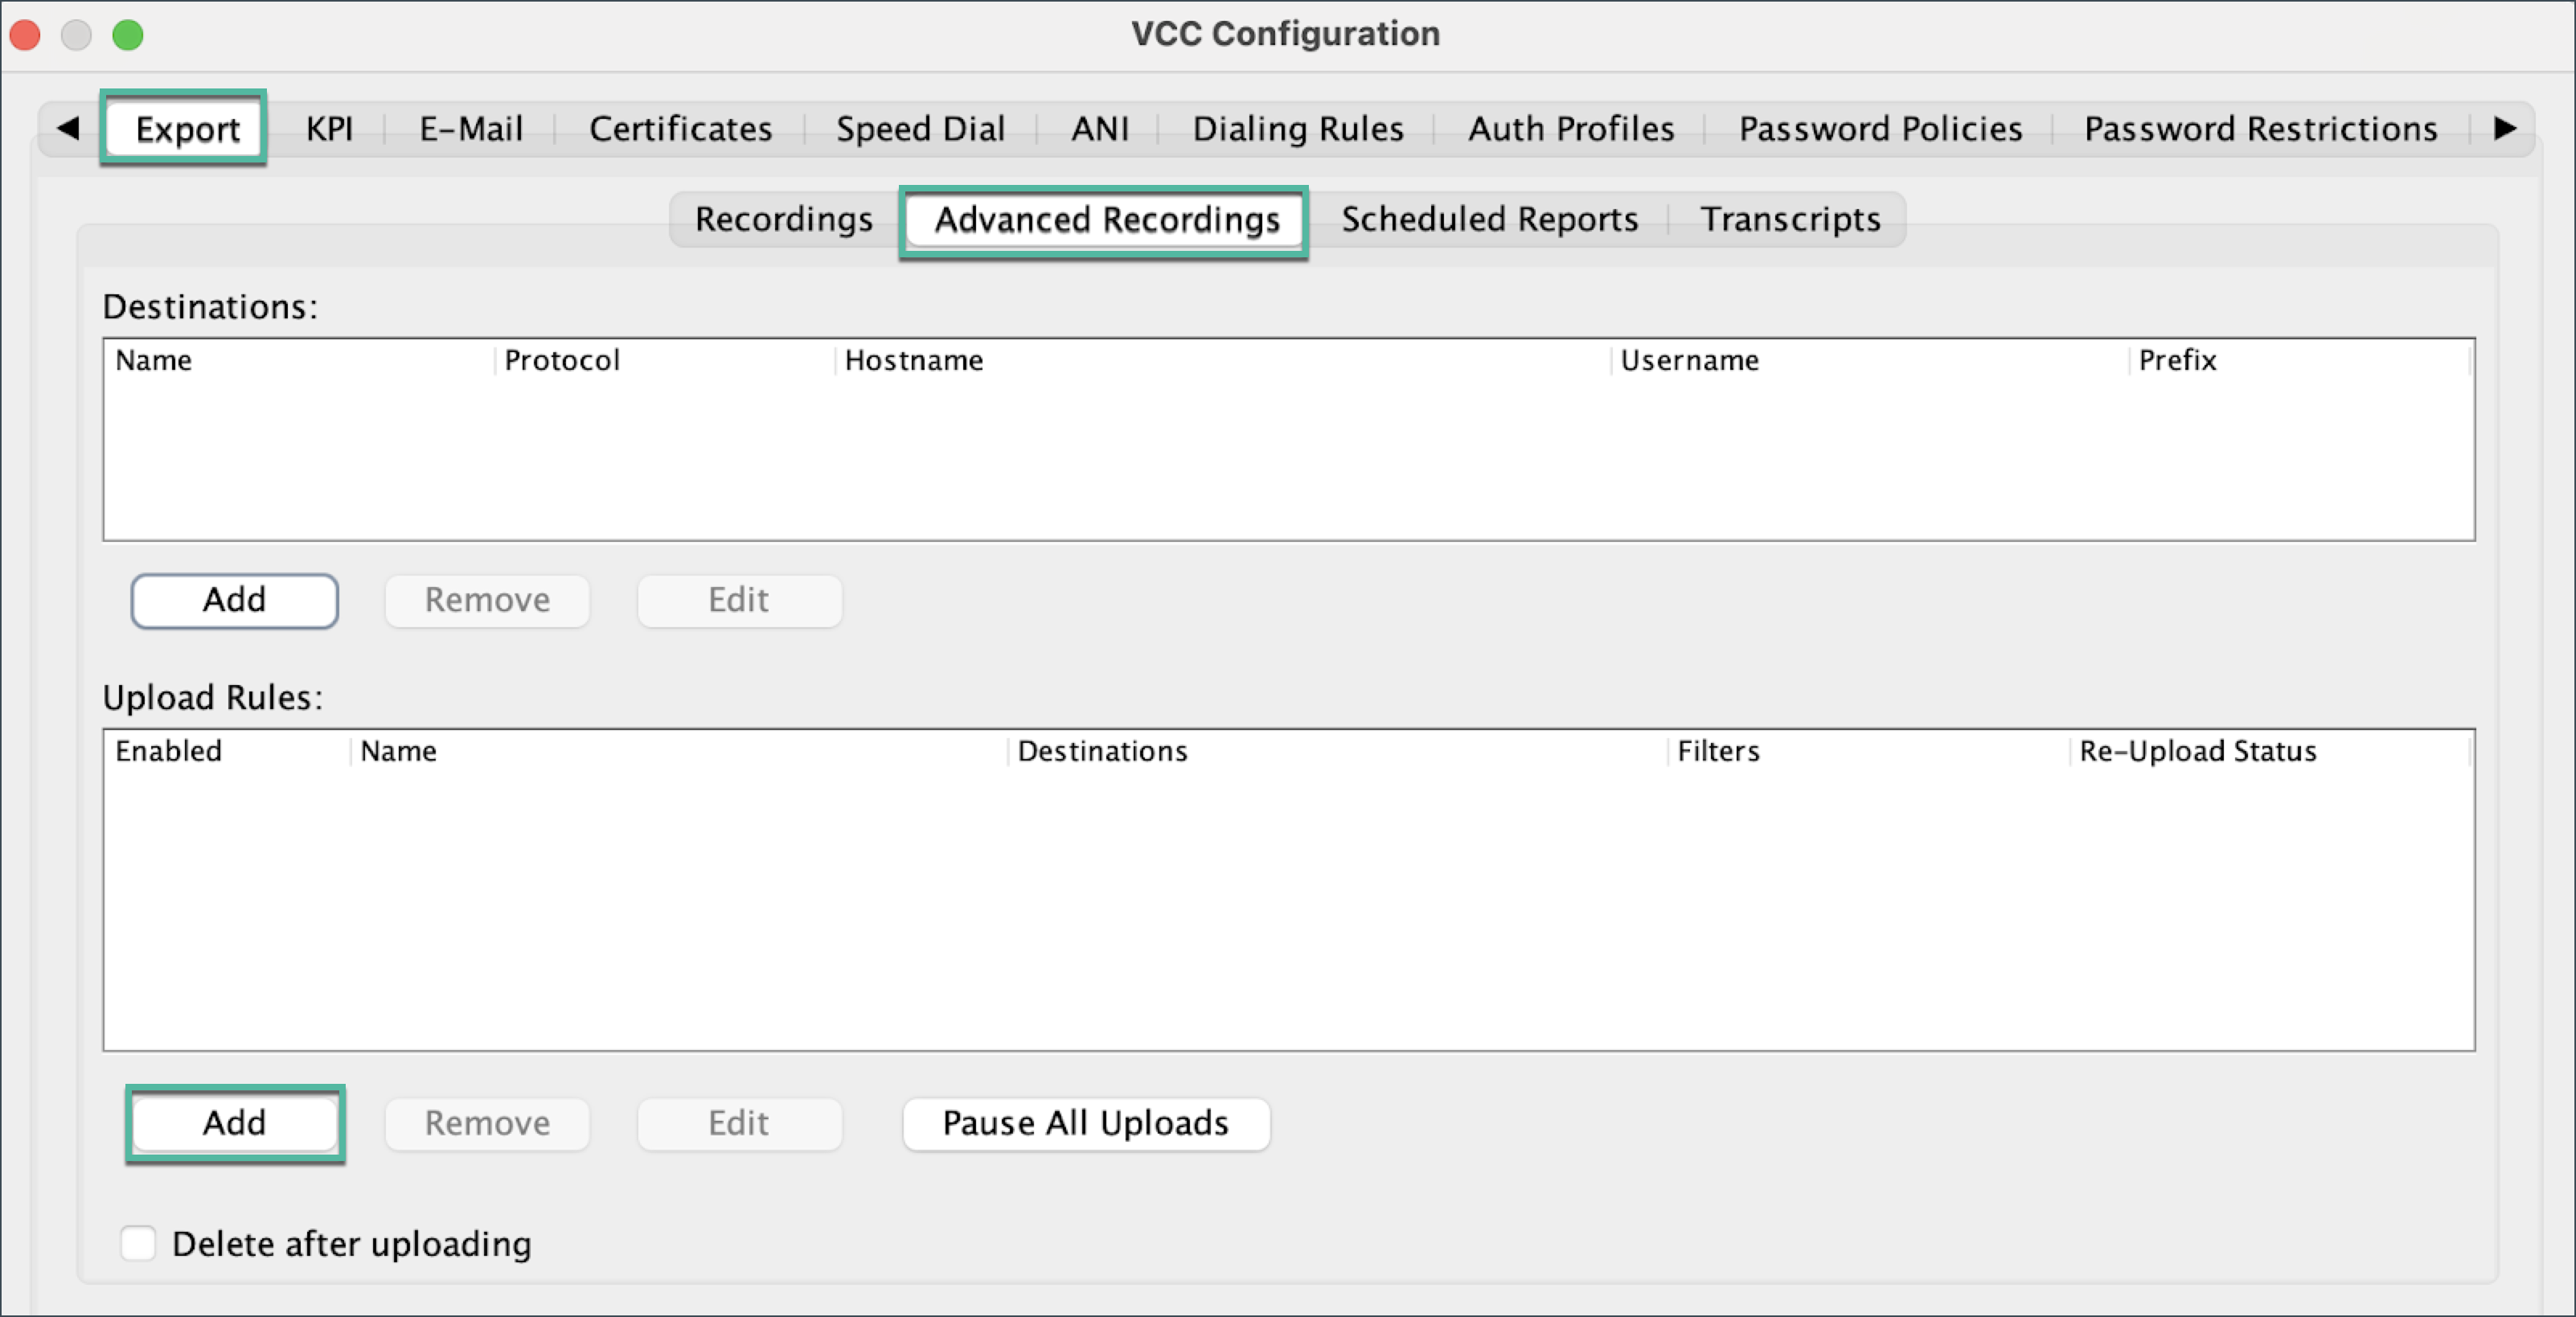
Navigate to the Export tab > Advanced Recordings; in the Destinations section, and click Add.
NOTE
If you don’t have access to the Advanced Recordings tab, please ask your Five9 Account Manager to activate it for you.
IMPORTANT
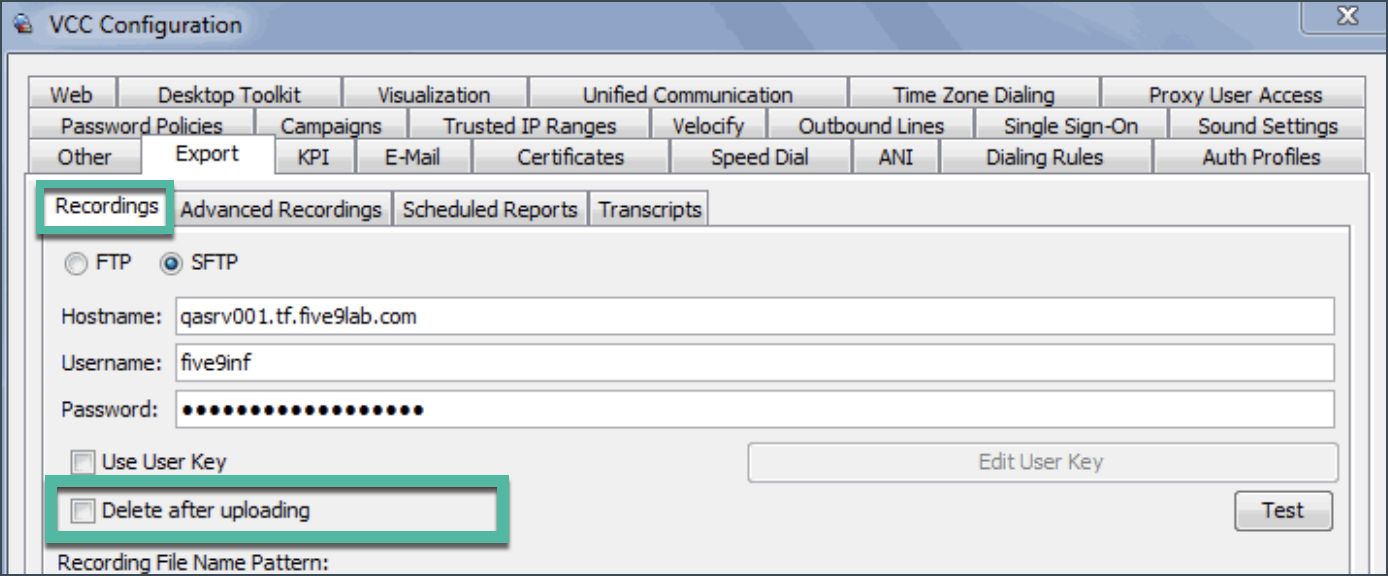
In the Recordings tab, ensure that the Delete after uploading option is NOT checked.
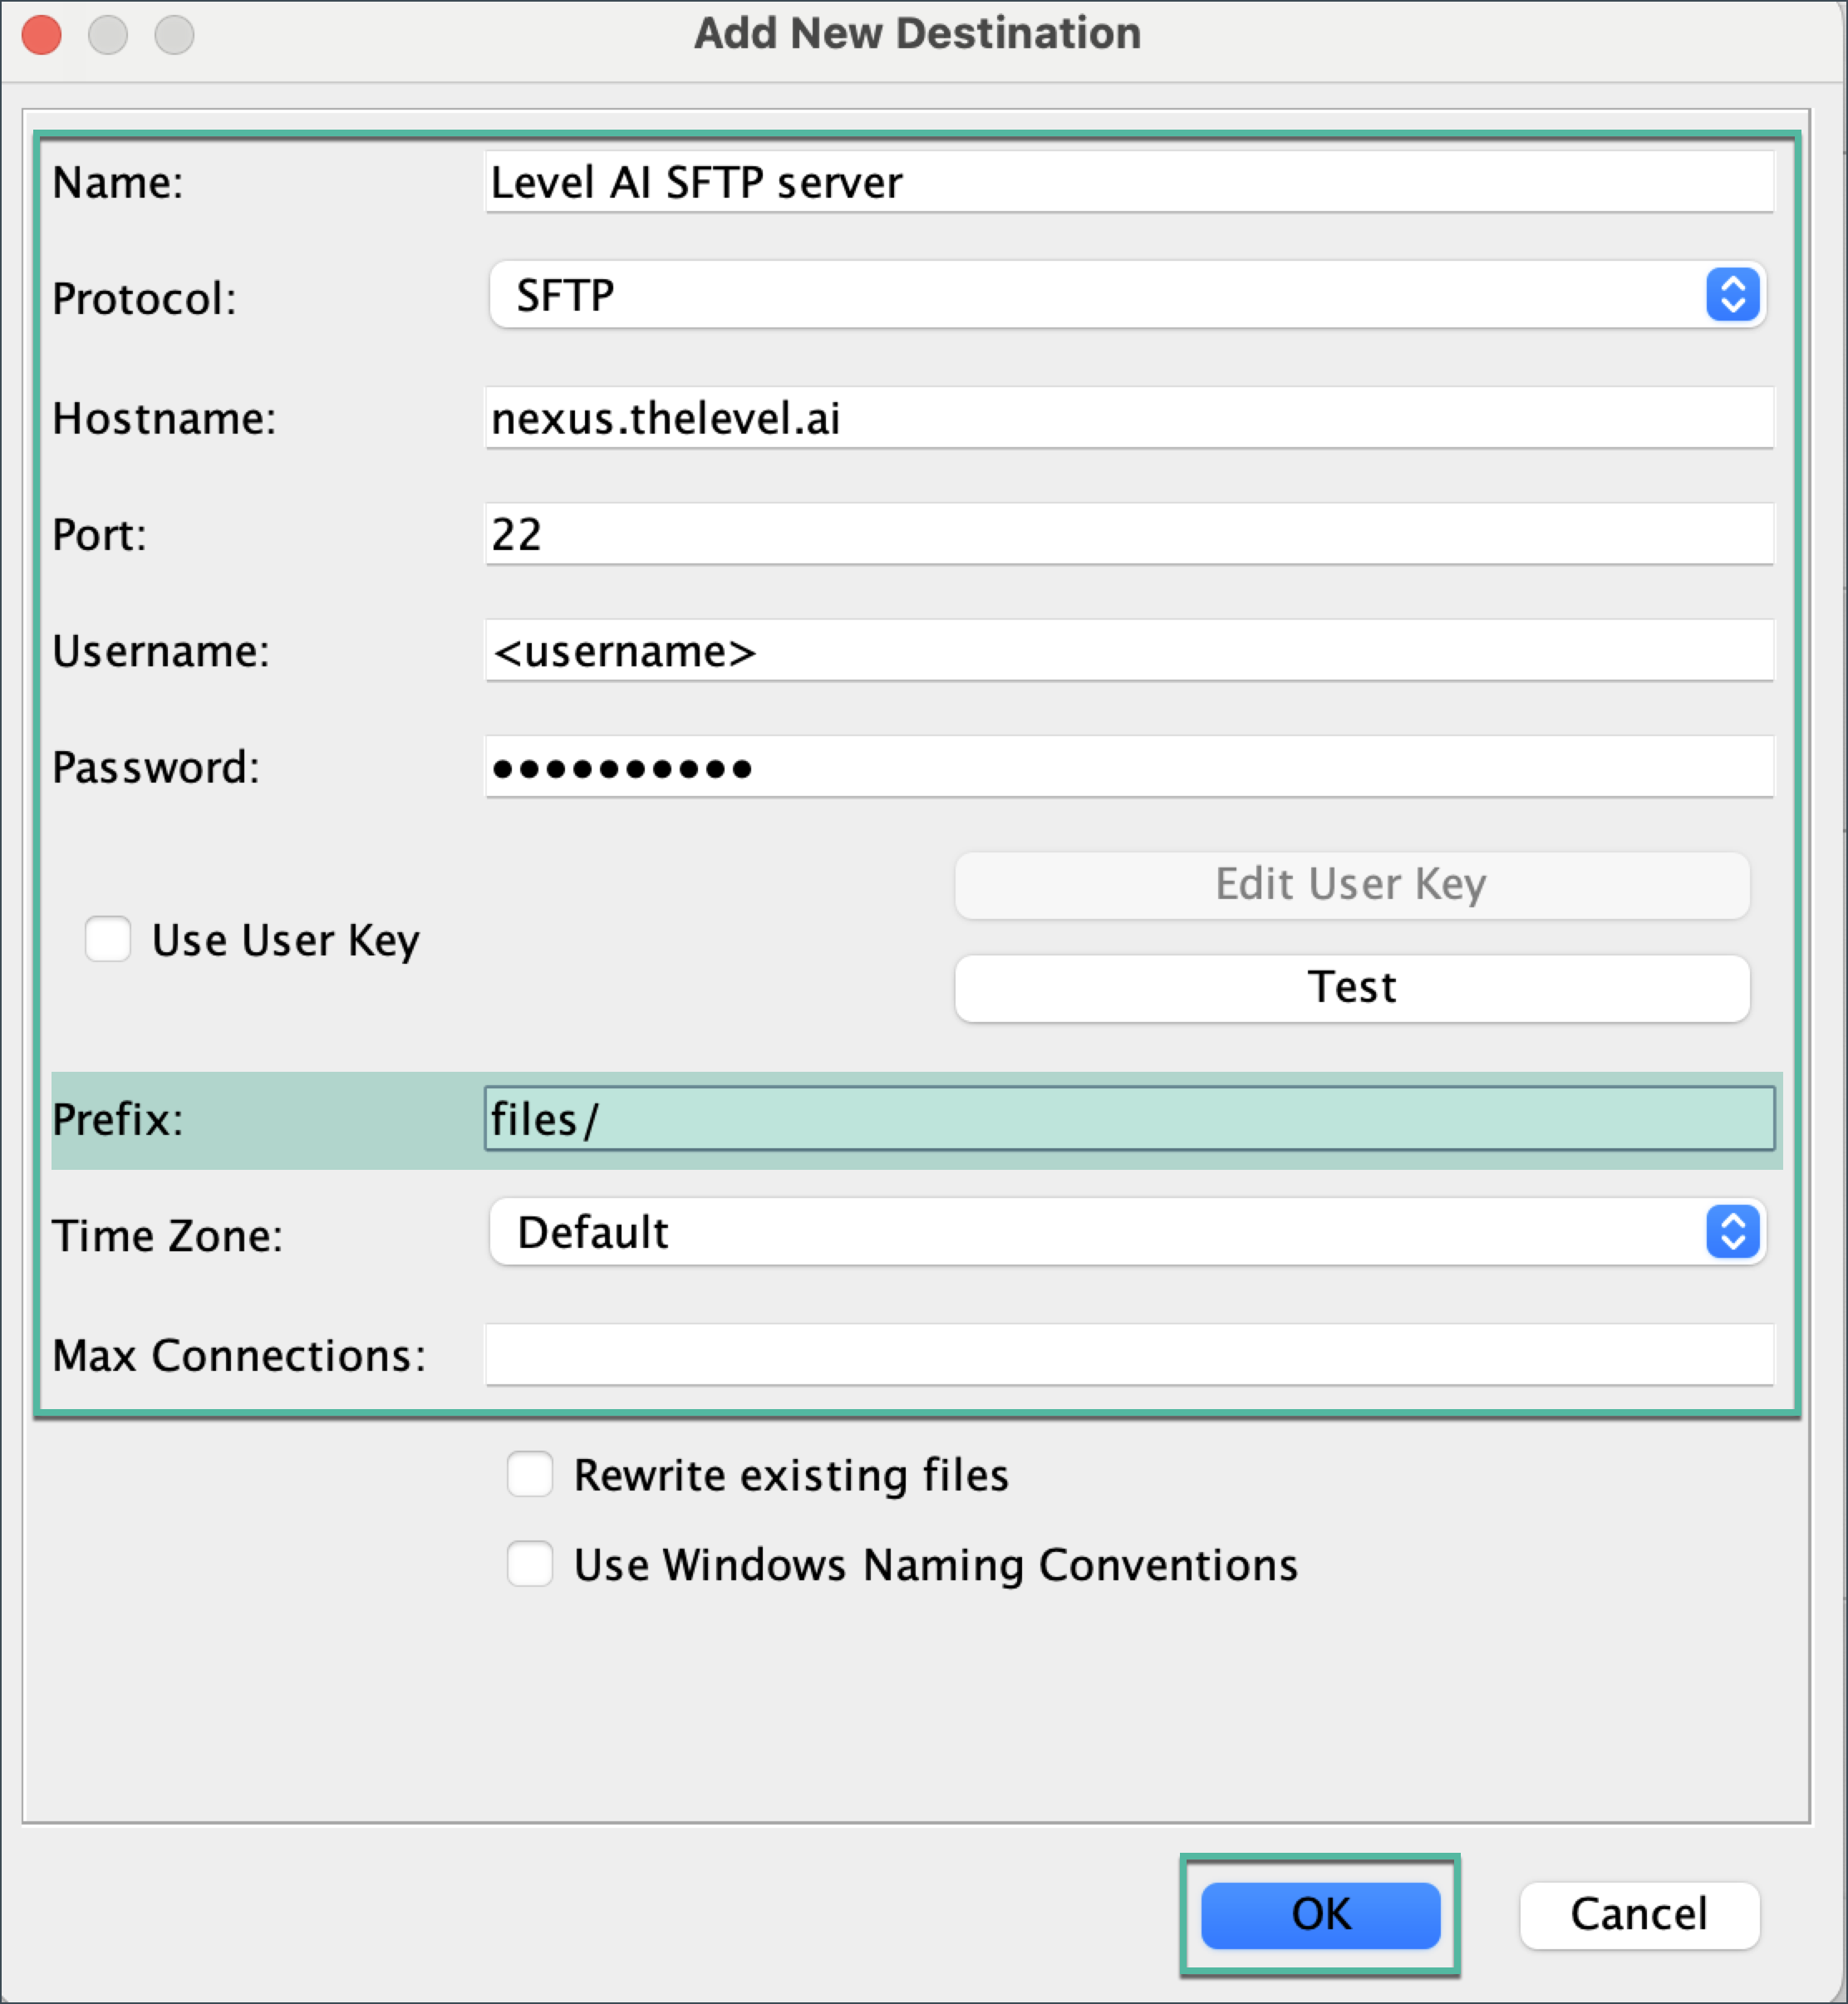
Enter the information below and click OK.
Name: Level AI SFTP Server
Protocol: SFTP
Hostname: nexus.thelevel.ai
Port: 22
Username:
Password:
Prefix: org_N/files/
Time Zone: Default
Max Connections:
Rewrite existing files
Use Windows Naming Conventions
NOTE
- Level AI will provide you with your unique Username and Password
- If you click the Test button, you may receive an error message FTP Login Fail: FTP Server did not reply. Disregard this message since this is a known Five9 bug. Your SFTP export will still upload successfully.
In the Upload Rules section, click Add.
Enter the information below and click OK
Name: Level AI Recording
In the Filter section
Condition Grouping: All
Click Add
Name: Call.length
Comparison Type: Is Greater Than or Equal to
Value: 0
Click OK
(IF NECESSARY) Click Add
Name: Call.start_timestamp
Comparison Type: Is Newer Than or Equal to
Constant:
Click OK
(IF NECESSARY) Click Add
Name: Call.start_timestamp
Comparison Type: Is Older Than or Equal to
Constant:
Click OK
Add additional filters as desired. If you want to upload only a subset of your recordings, refer to the Five9 VCC documentation for more detailed options.
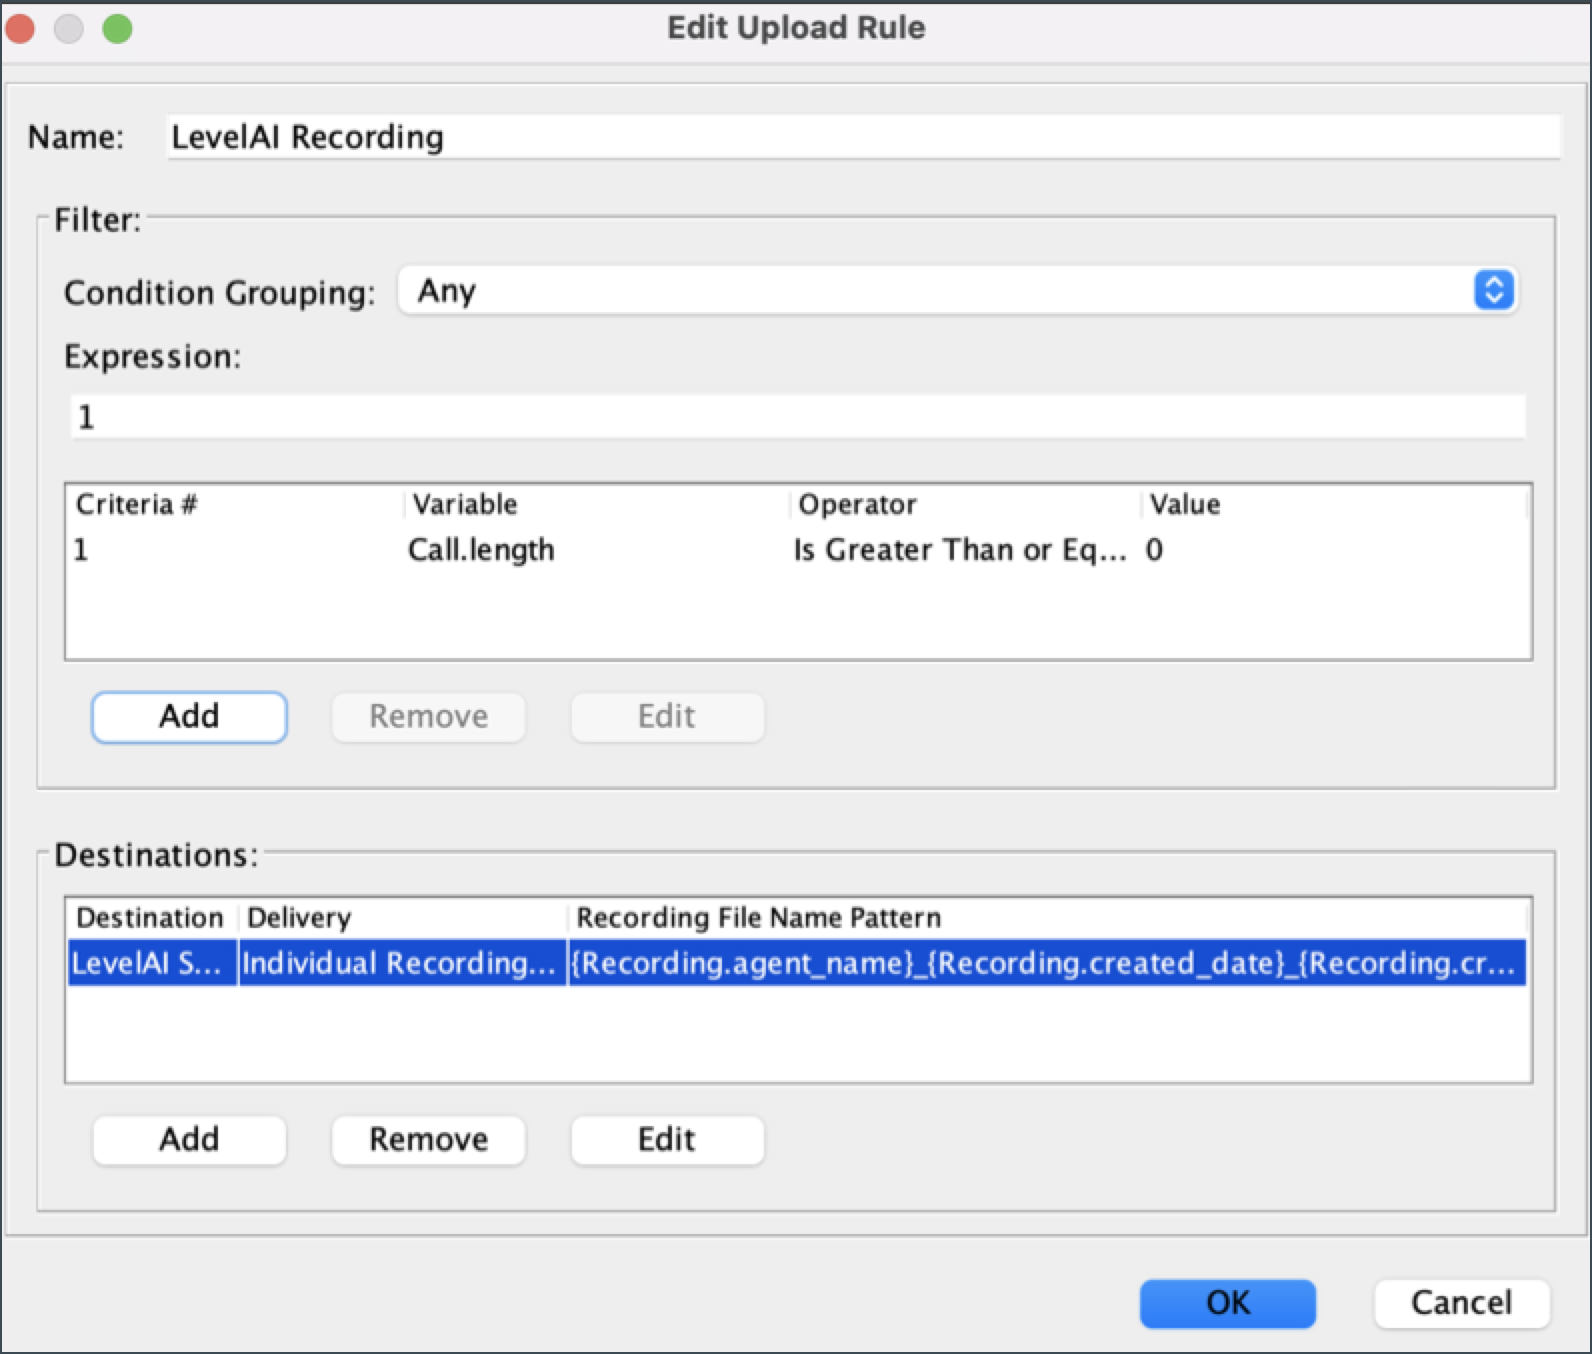
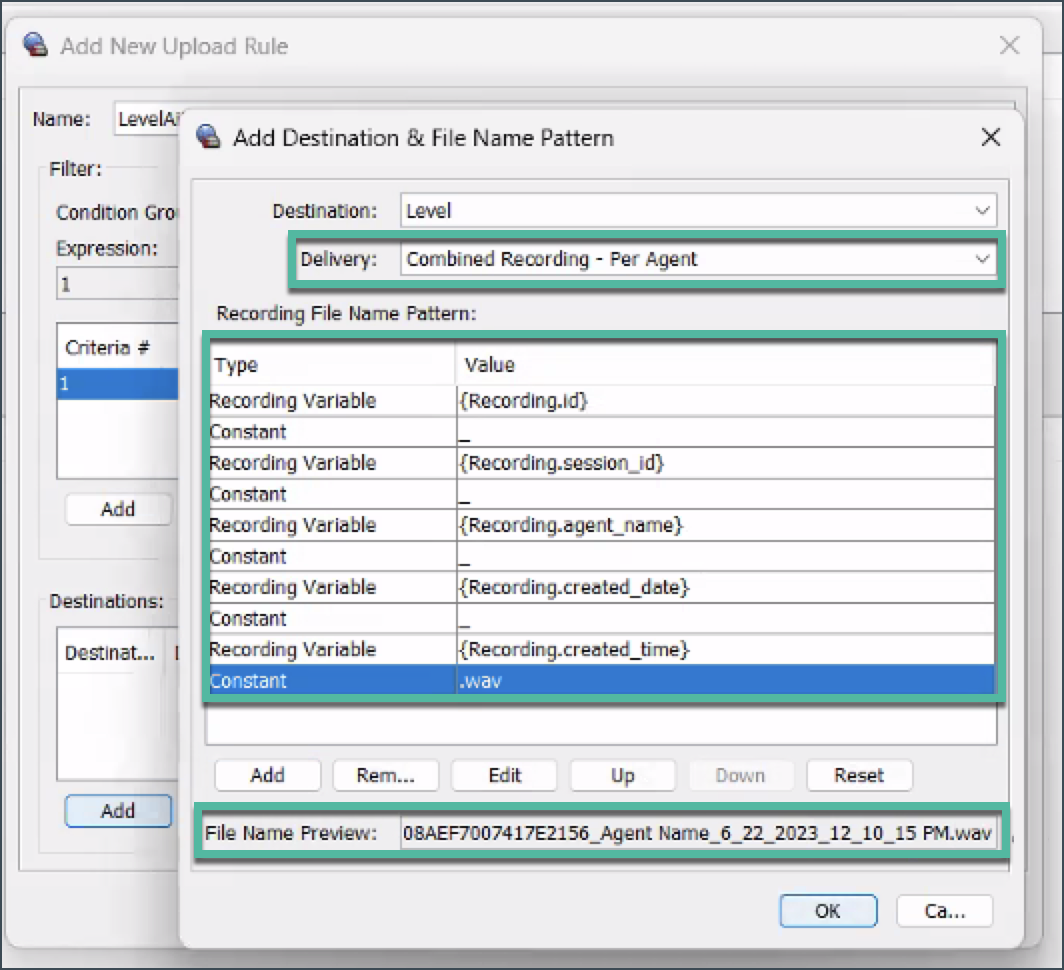
In the Destinations section, click Add
Destination:
Delivery: Combined Recording - Per Agent
Recording File Name Pattern:
Type
Value
Recording Variable
{Recording.id}
Constant
_
Recording Variable
{Recording.session_id}
Constant
_
Recording Variable
{Recording.agent_name}
Constant
_
Recording Variable
{Recording.created_date}
Constant
_
Recording Variable
{Recording.created_time}
Constant
.wav
It is important to retain the order as shown:
Part 2 - Metadata Scheduled Report - Call Recording
From the Five9 homepage, log in to your Five9 Cloud Contact Center.
Navigate to Dashboard and Reports
Navigate to Custom Reports
Click Create New Custom Report
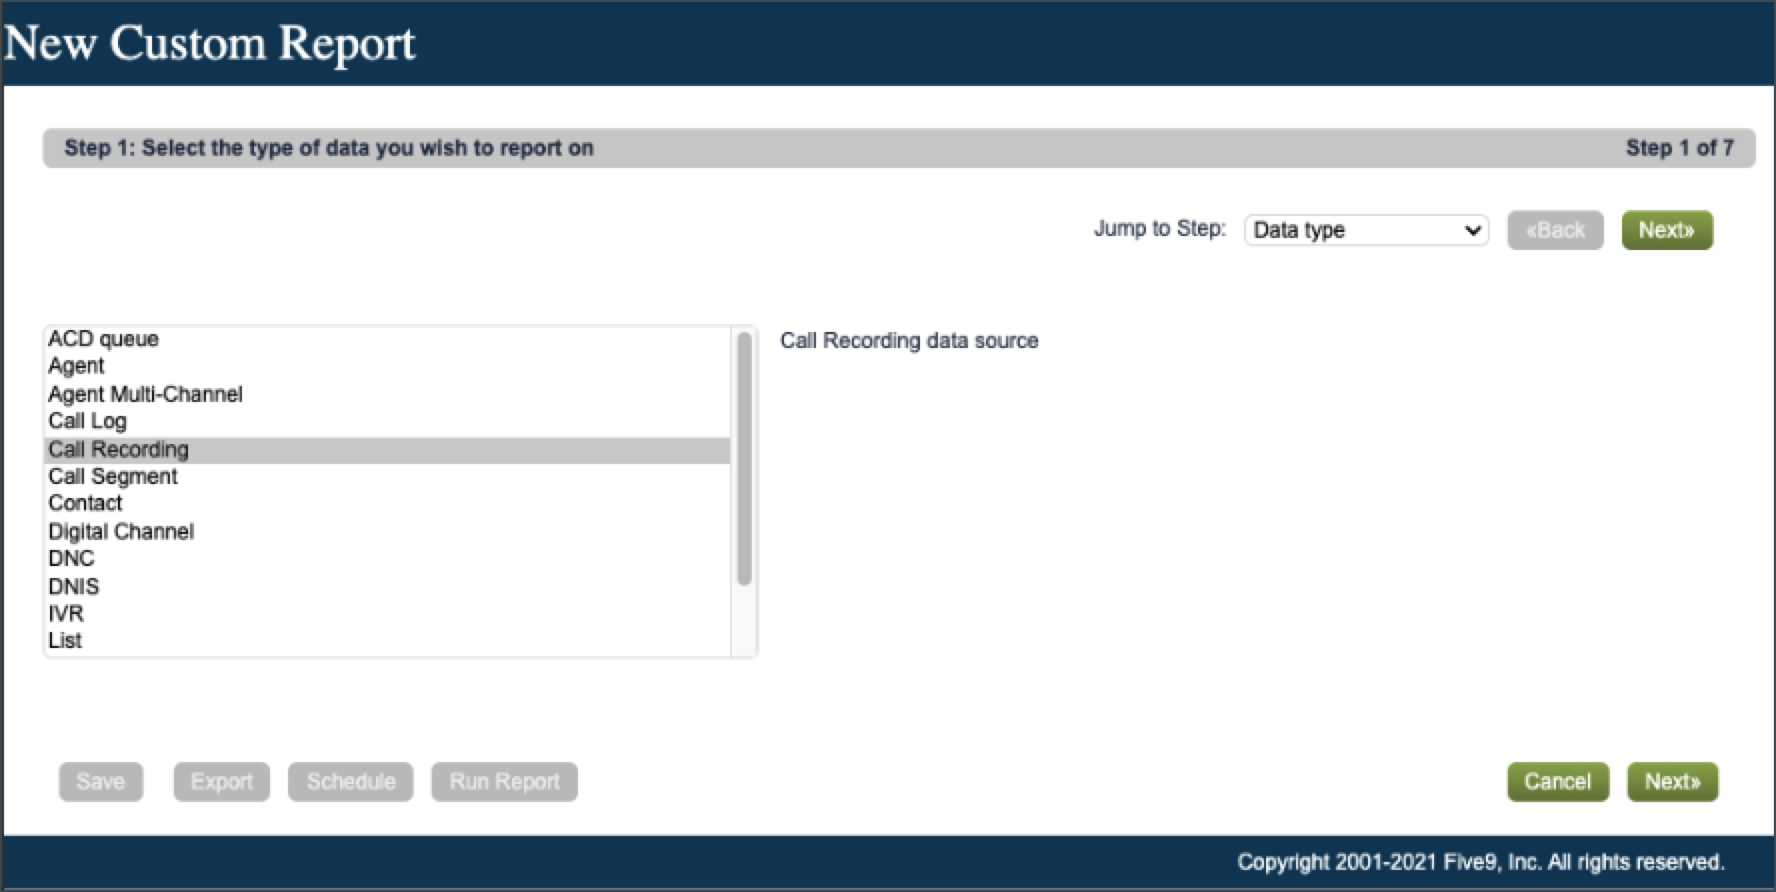
Complete each respective step of the report creation process as follows
Step 1: Call Recording
Step 2: Tabular Report
Step 3: Level AI recommends that you select all columns EXCEPT for Worksheet data since these are the fields you’ll be able to see and potentially filter on in Level AI
The minimum set of columns Level AI needs to successfully process a conversation are: AGENT, FILENAME, AGENT LAST NAME, AGENT ID, AGENT FIRST NAME, AGENT NAME, TIMESTAMP, SESSION ID, AGENT GROUP
Step 4: <accept default and click Next>
Step 5: <accept default and click Next>
Step 6: TIMESTAMP
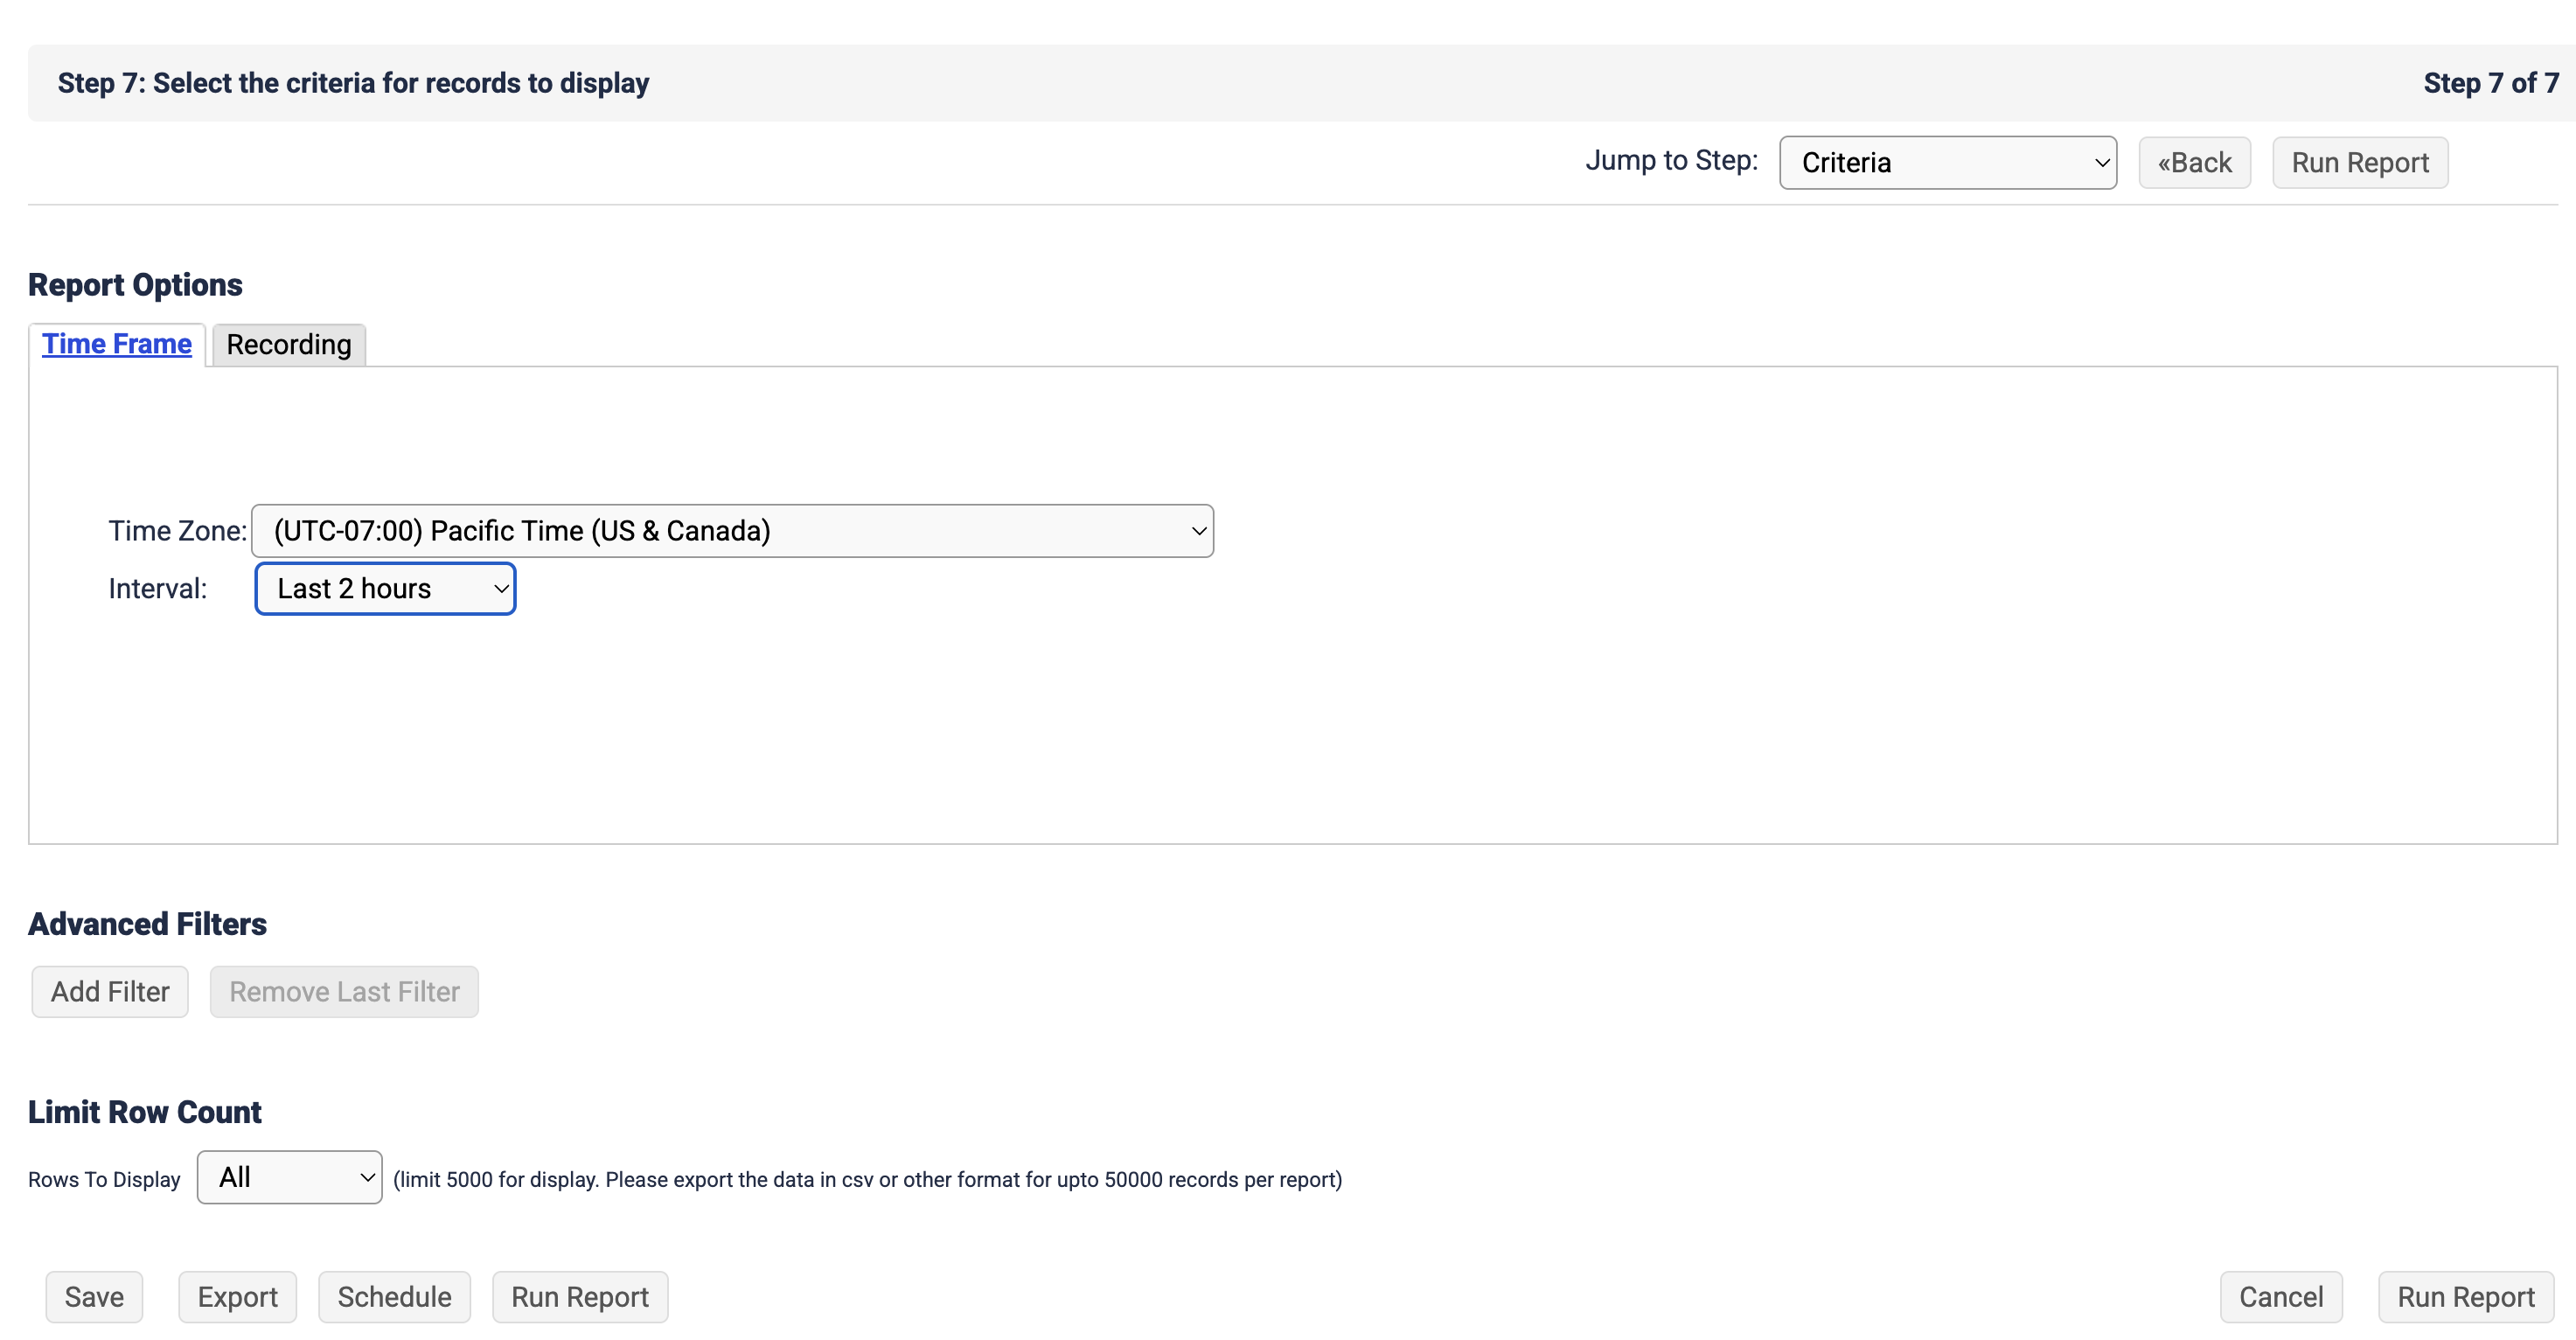
Step 7:
Time Zone: choose your timezone
Interval: Last 2 Hours
Add any additional filters you might need; e.g. CAMPAIGN
OPTIONAL: Click Save to save the report in the event you need to make adjustments in the future
Set the schedule for the report as illustrated.
Scheduled Report Name: Five9_LevelAI_Metadata_Report
Scheduled Report Description: copy and paste the text below and make the adjustments listed
Replace and with the actual values provided by your IM/TAM
Set the onfailure to that of your Five9 Admin. This will notify your Admin in case of any failures in sending the scheduled report to Level AI.
mail2ftp:{ transport: 'SFTP', host: 'nexus.thelevel.ai', login: '', password: '', folder: 'org_N/files/reports', onFailure: '', filename:'Metadata_Report%Y_%m-%d_%H_%M.csv', port: '22'}NOTE
- The field has a 255 character limit.
- Replace the terms within ' ' with the relevant values. Make sure you use single quotes and not back ticks.
Delivery Report: via E-mails
Emails: gw@mail2ftp.five9.com
Time Zone: choose your timezone
Start date: today's date or other desired start date
End date: choose a date that is as far out as the screen allows
Enabled: <checked>
Output Format: CSV (UNIX)
Hourly - check the box for each hour
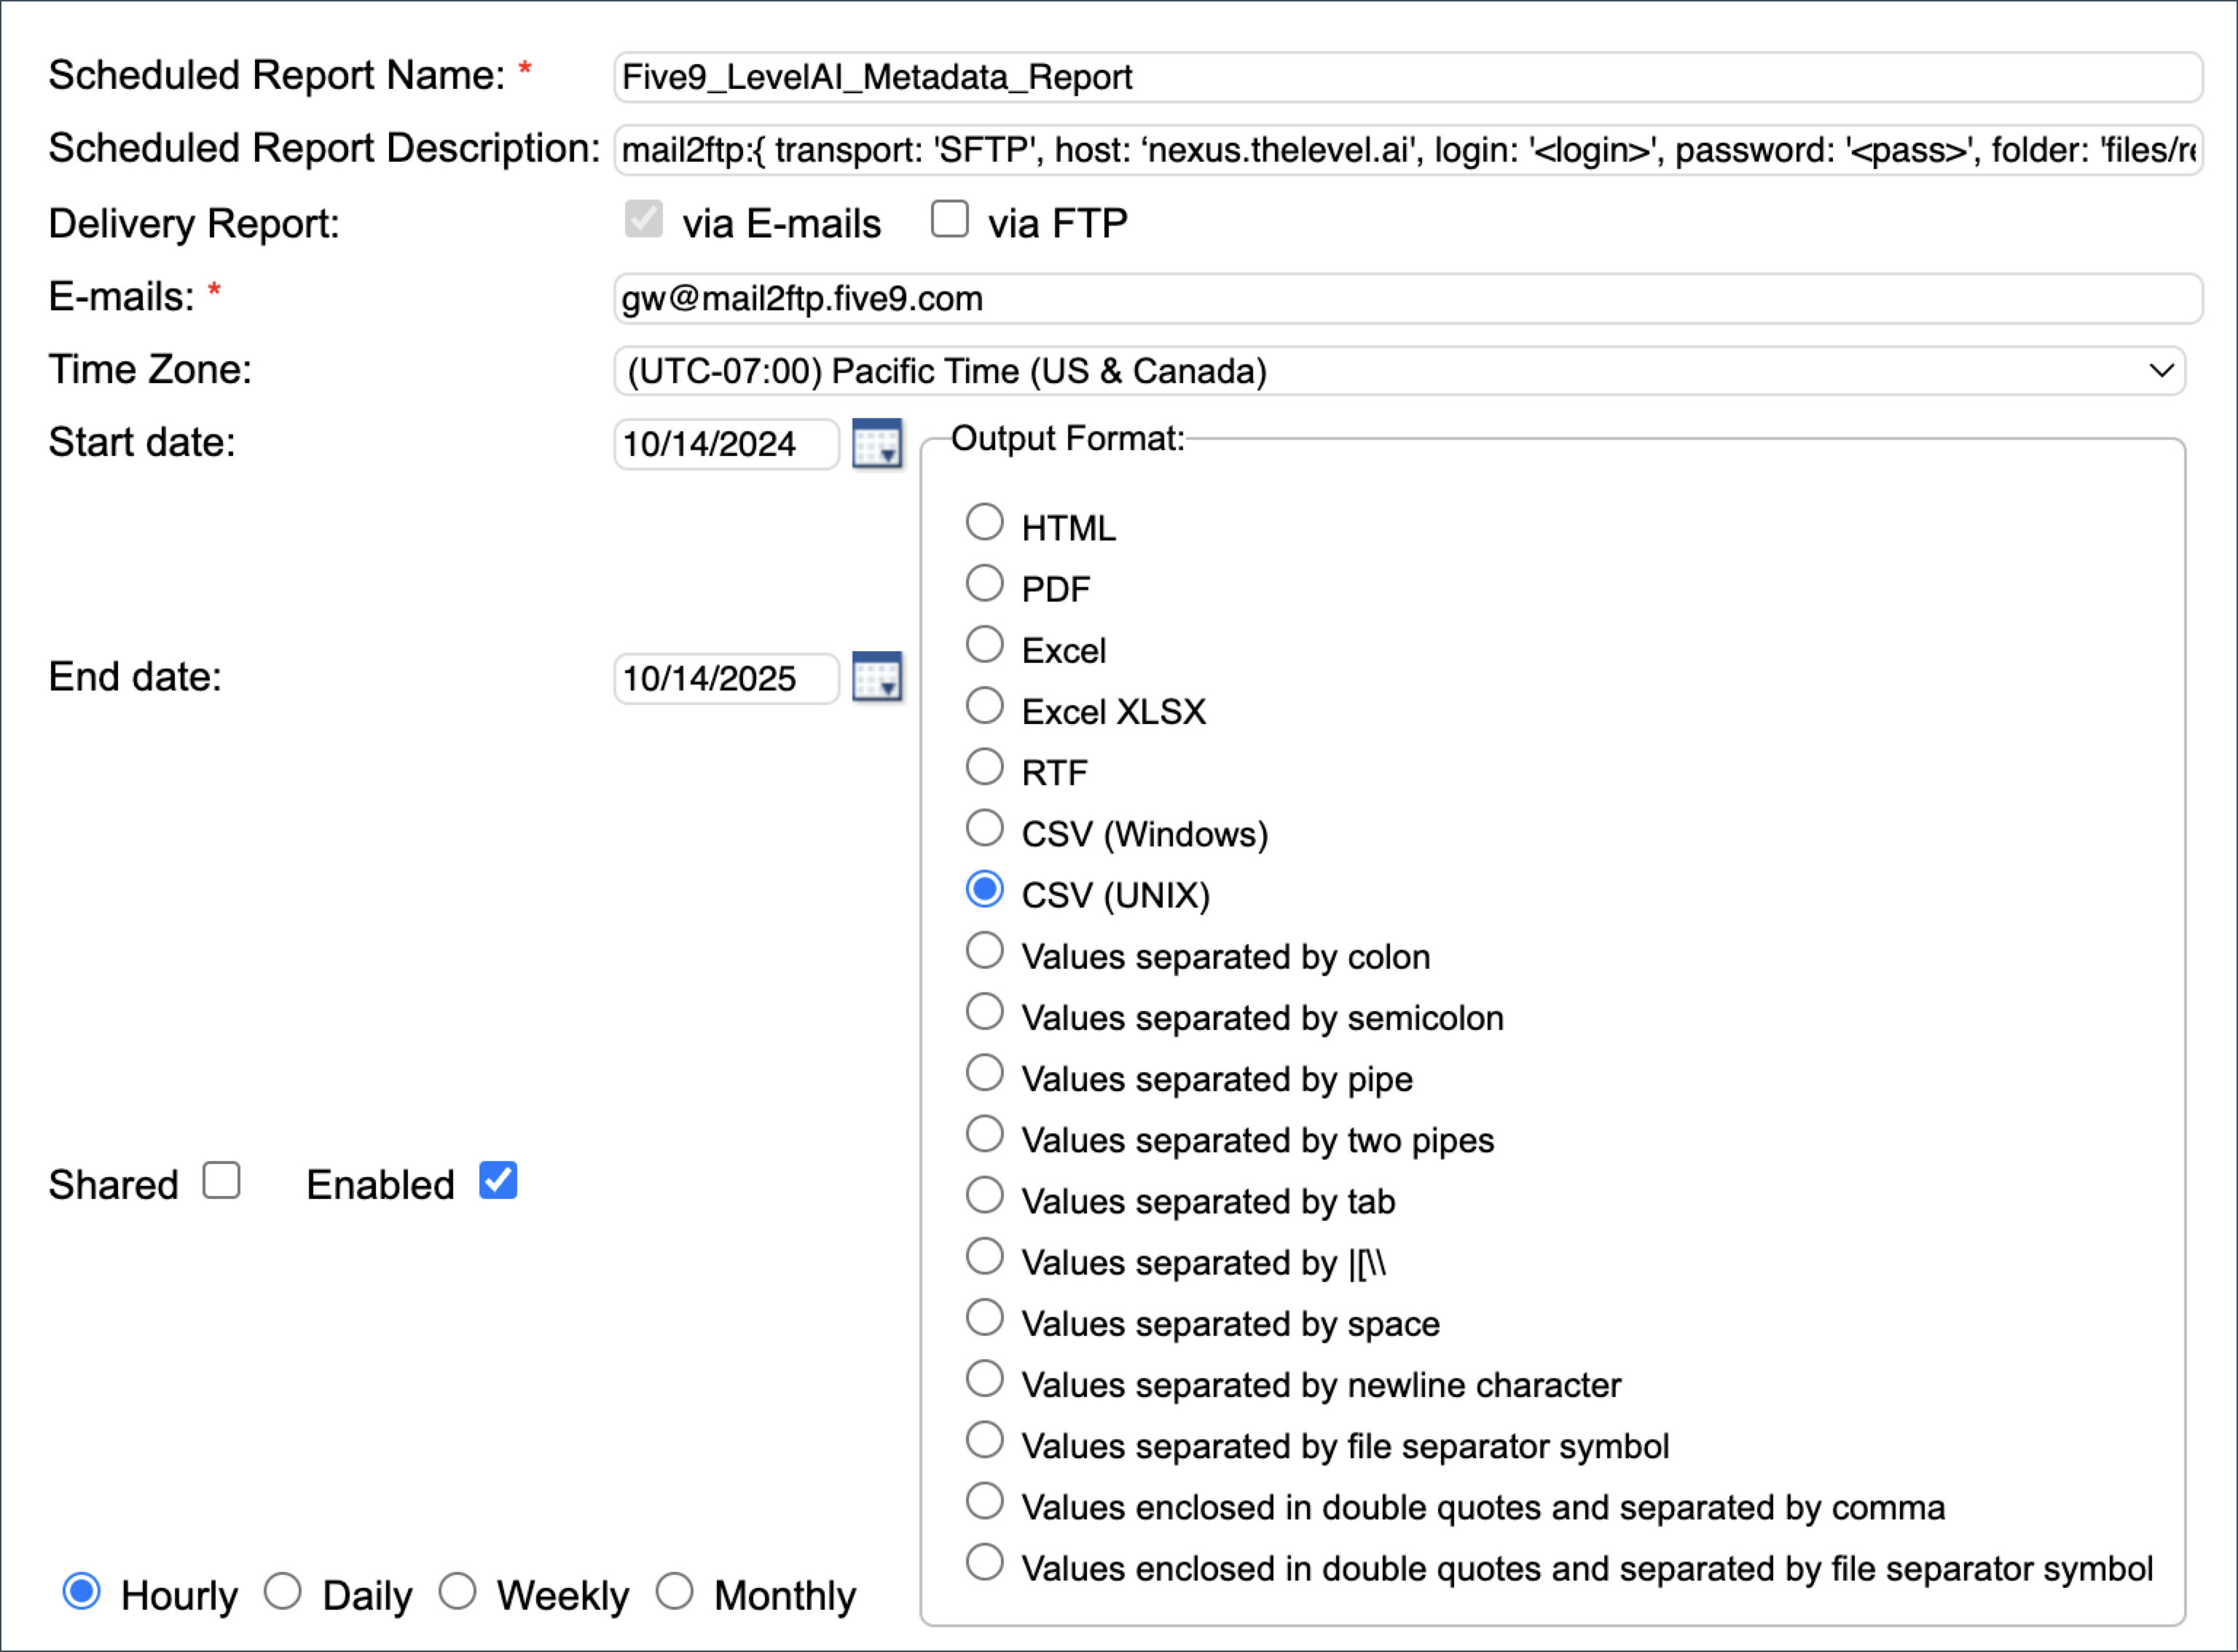
If you would like an even quicker cadence, please inform your Level AI representative. This will require multiple reports (with different Minute triggers) to be set up.
The chosen cadence affects what is selected in Report Options > Time Frame > Interval
- If a metadata report should be run hourly, select Past Hour
- If multiple metadata reports should be run per hour, select This Hour
- If a metadata report should be run once, select the specific date range.
Part 3 - Metadata Scheduled Report - Agents
This report helps link calls to the proper agent during transfers.
From the Five9 homepage, log in to your Five9 Cloud Contact Center.
Navigate to Dashboard and Reports
Navigate to Custom Reports
Click Create New Custom Report
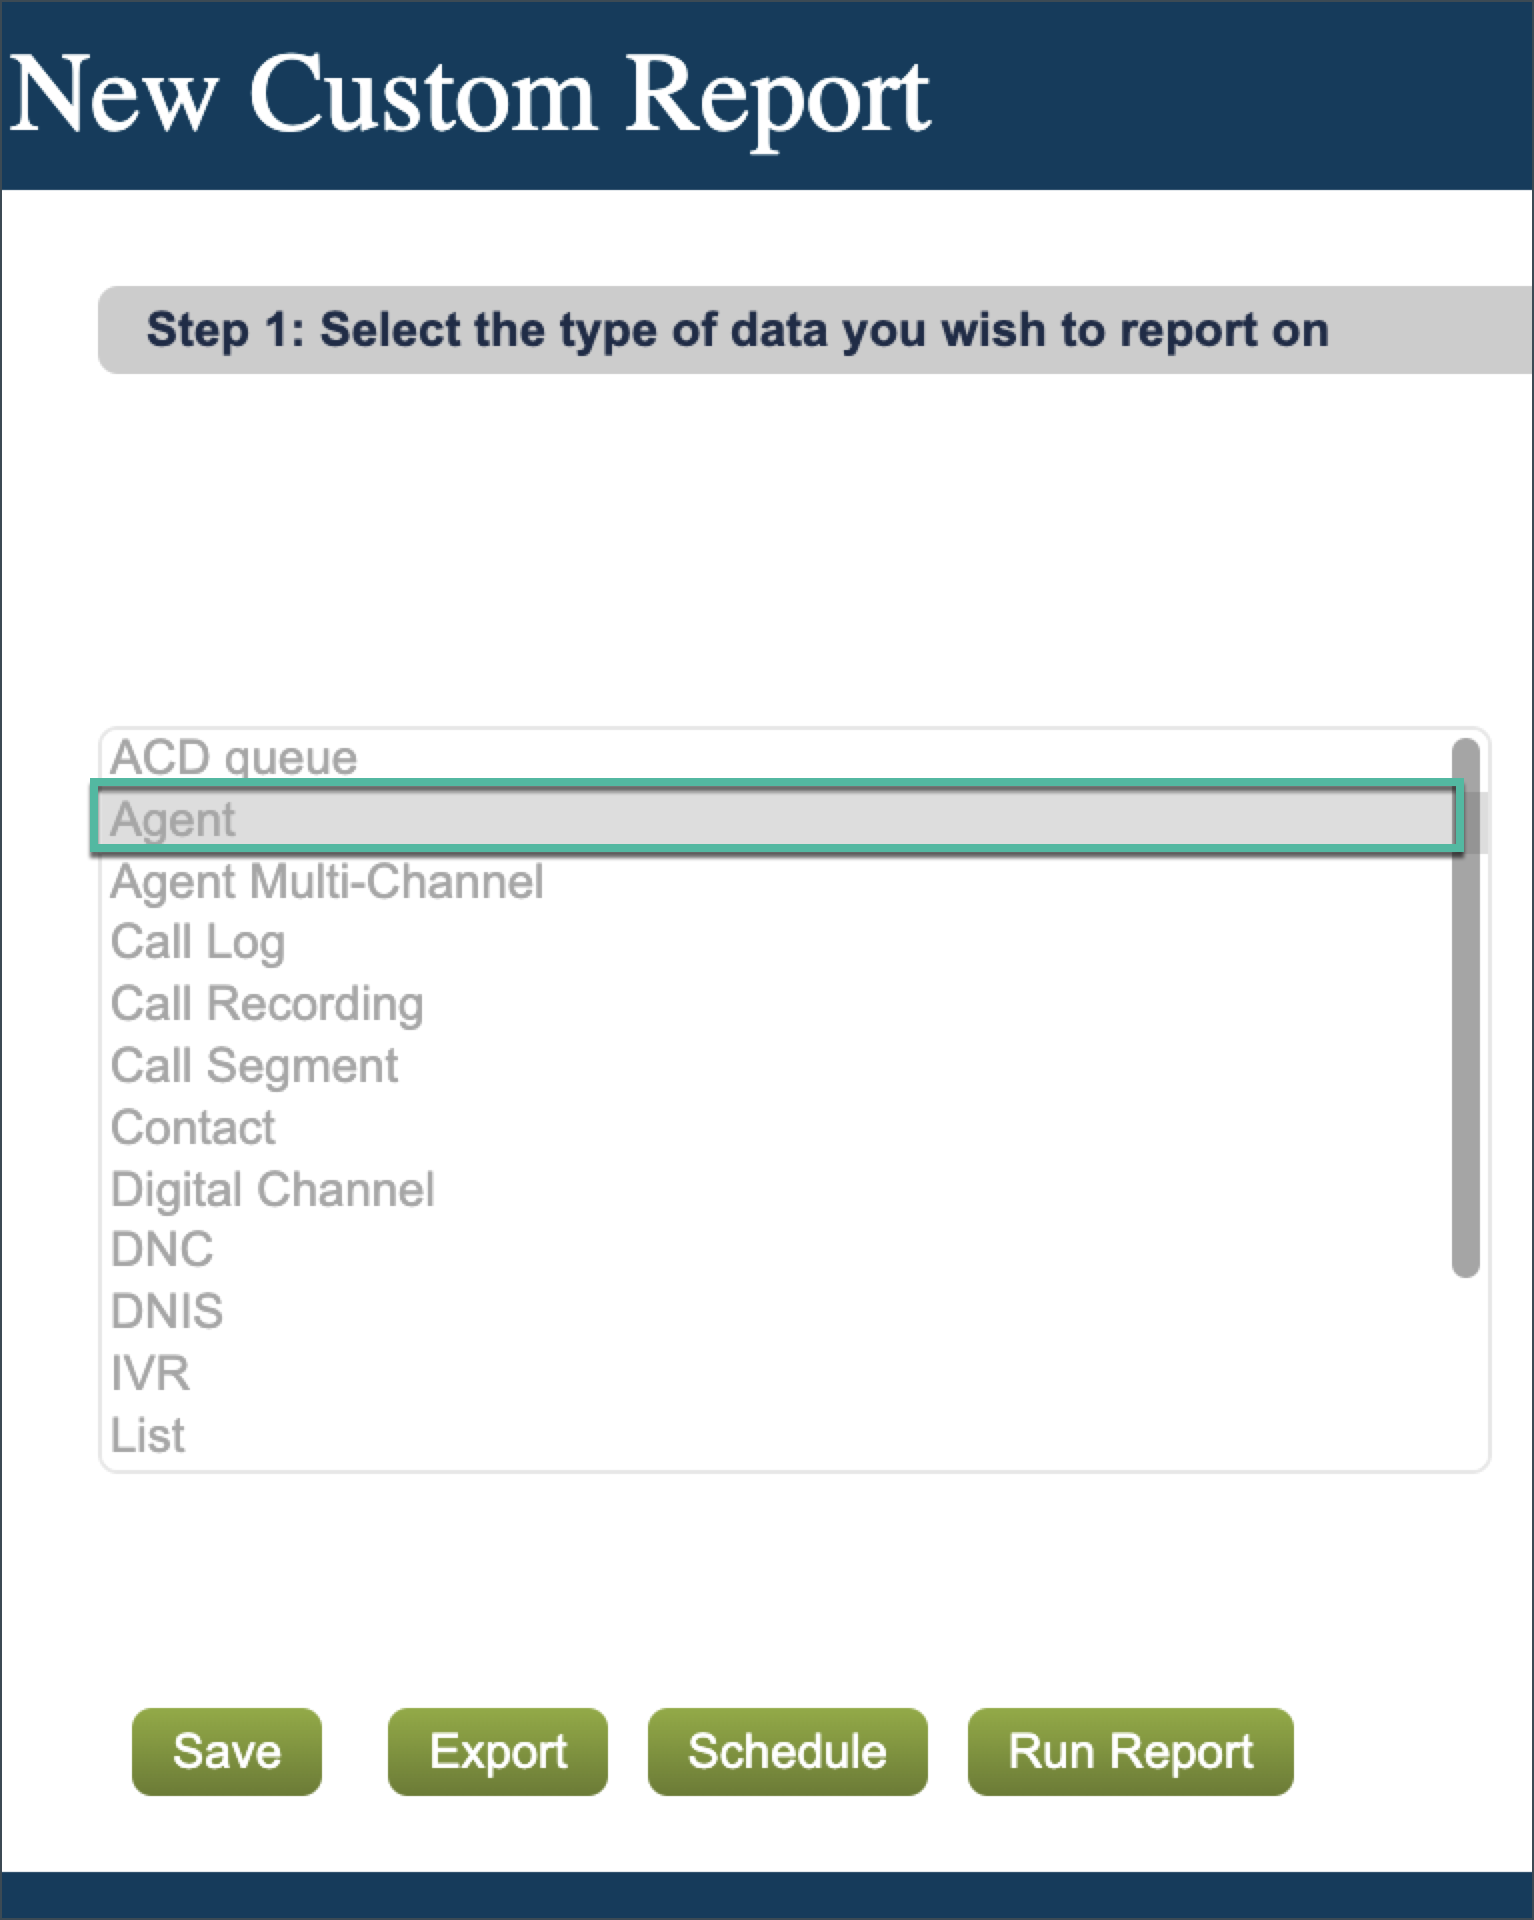
Complete each respective step of the report creation process as follows
Step 1: Agent
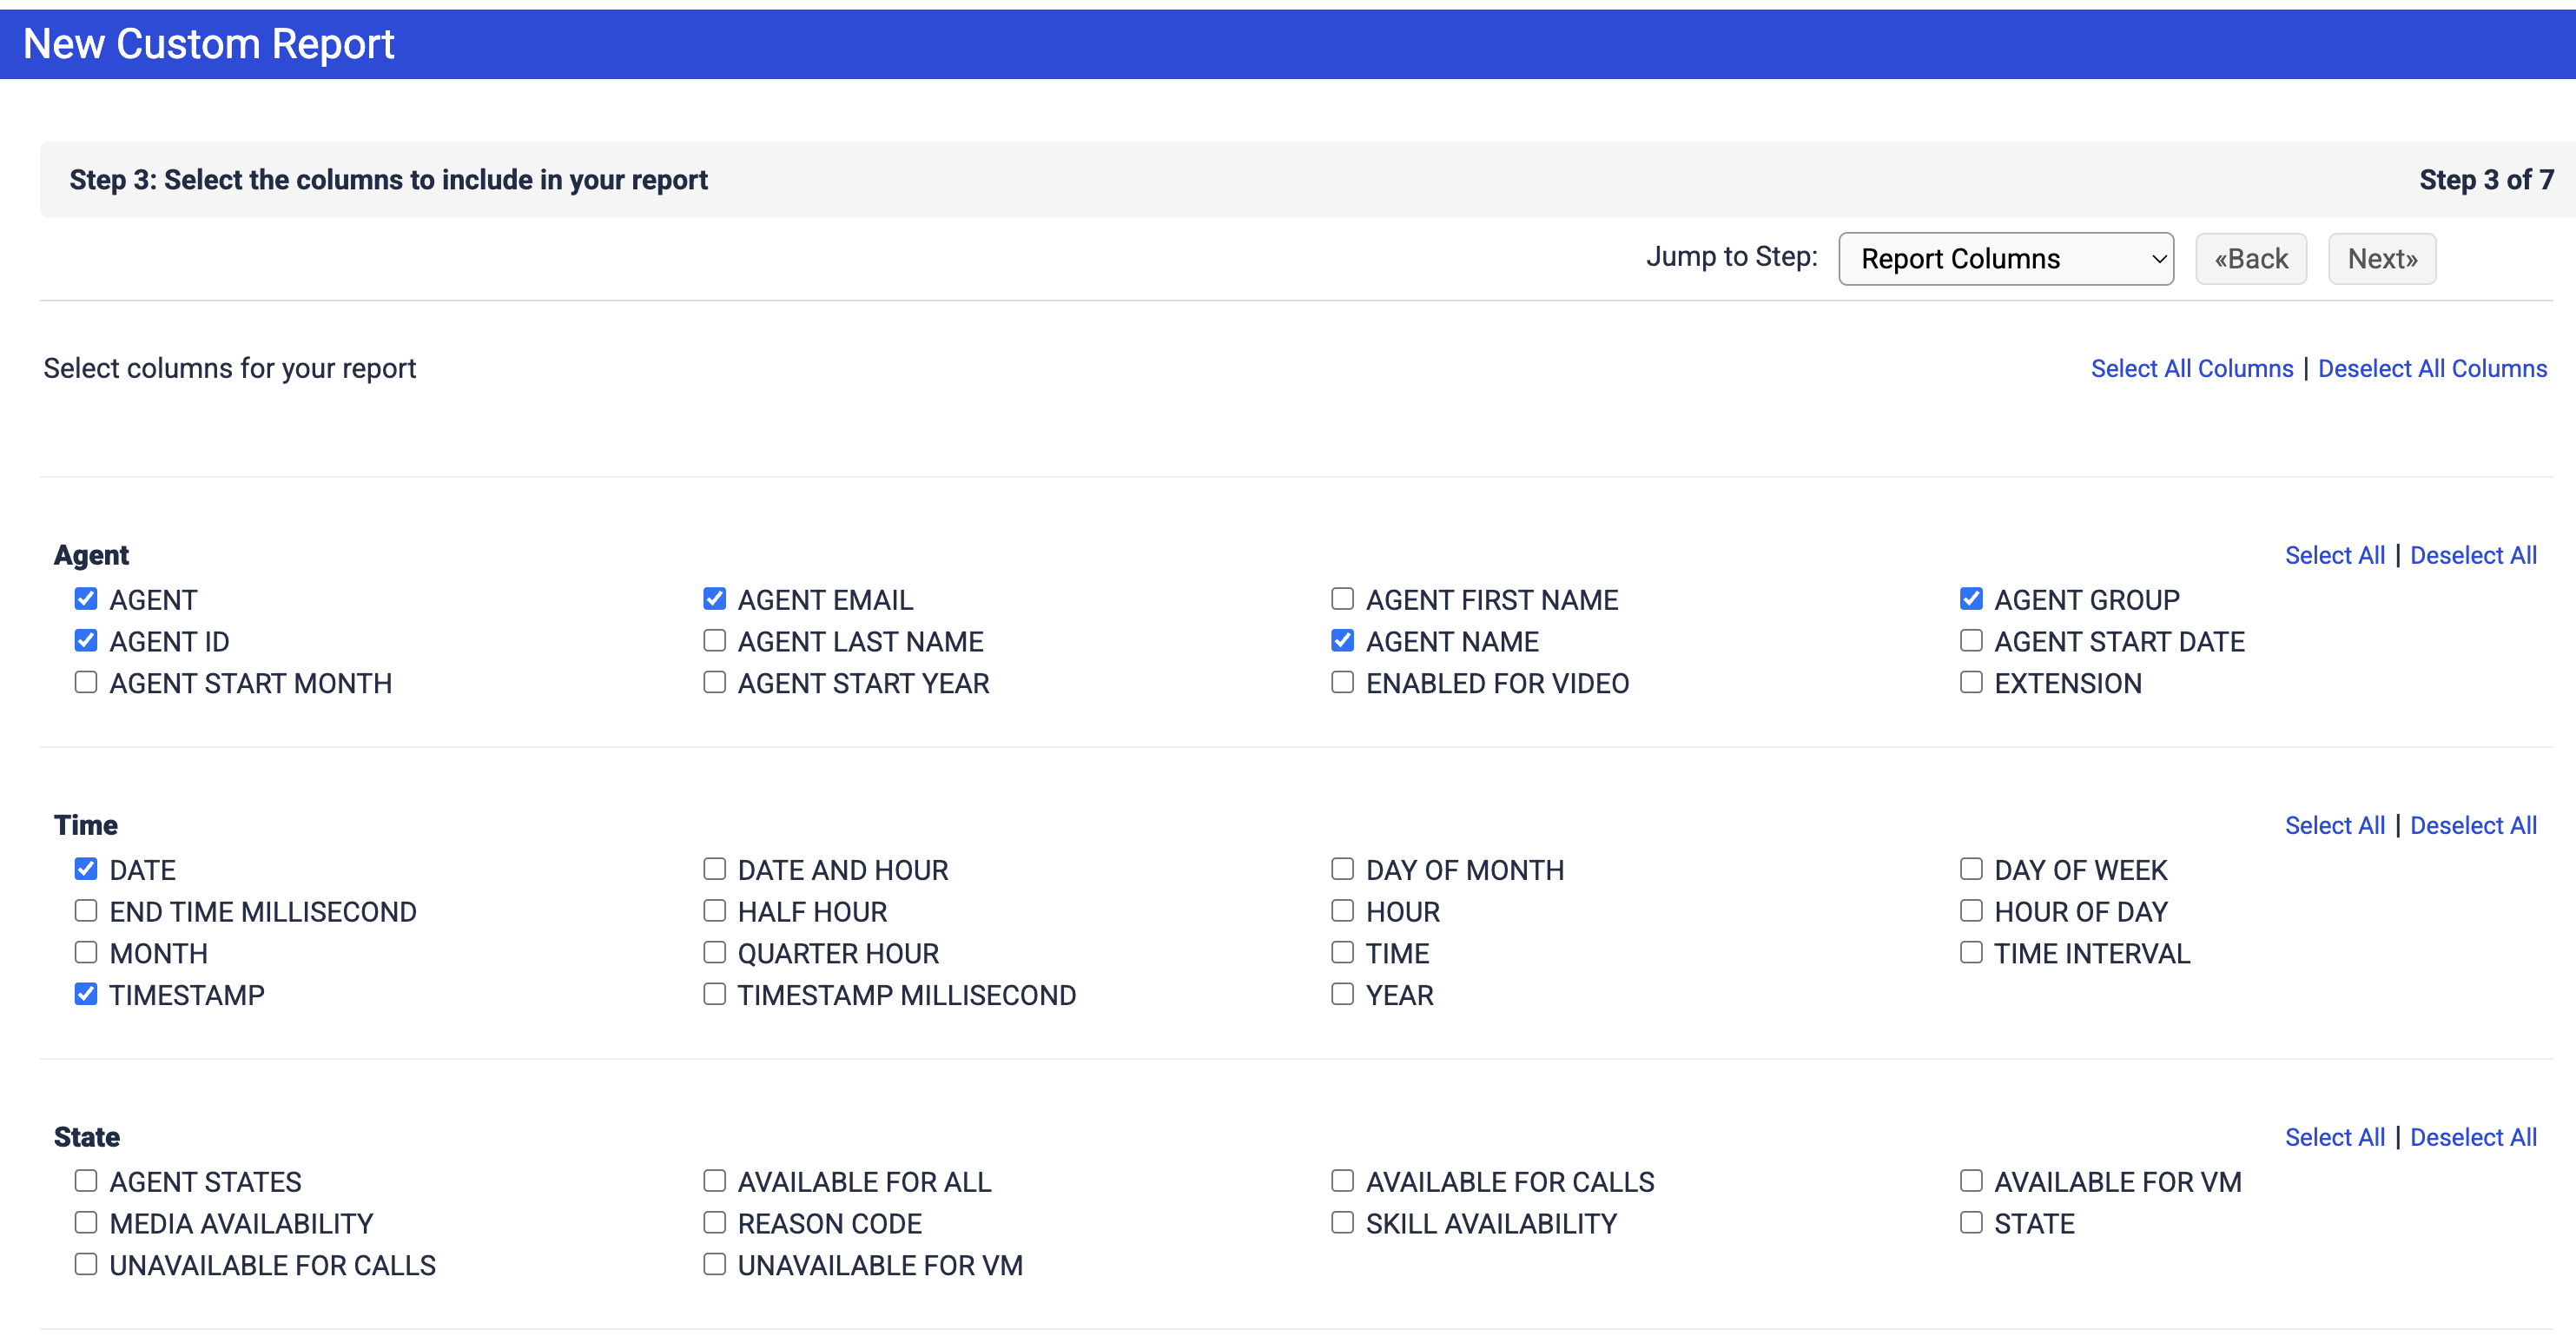
Step 2: Tabular Report
Step 3: Select these columns: AGENT, AGENT EMAIL, AGENT ID, AGENT NAME, DATE, TIMESTAMP
Step 4: <accept default and click Next>
Step 5: <accept default and click Next>
Step 6: TIMESTAMP
Step 7:
Time Zone: choose your timezone
Interval: Last 2 Hours
Add any additional filters you might need; e.g. CAMPAIGN
OPTIONAL: Click Save to save the report in the event you need to make adjustments in the future
Set the schedule for the report as illustrated.
Scheduled Report Name: Five9_LevelAI_Agent_Report
Scheduled Report Description: copy and paste the text below and make the adjustments listed
Replace and with the actual values provided by your IM/TAM
Set the onfailure to that of your Five9 Admin. This will notify your Admin in case of any failures in sending the scheduled report to Level AI.
mail2ftp:{ transport: 'SFTP', host: 'nexus.thelevel.ai', login: '', password: '', folder: 'org_N/files/reports', onFailure: '', filename:'Agent_Report%Y_%m-%d_%H_%M.csv', port: '22'}NOTE
- The field has a 255 character limit.
- Replace the terms within ' ' with the relevant values. Make sure you use single quotes and not back ticks.
Delivery Report: via E-mails
Emails: gw@mail2ftp.five9.com
Time Zone: choose your timezone
Start date: today's date or other desired start date
End date: choose a date that is as far out as the screen allows
Enabled: <checked>
Output Format: CSV (UNIX)
Hourly - check the box for each hour
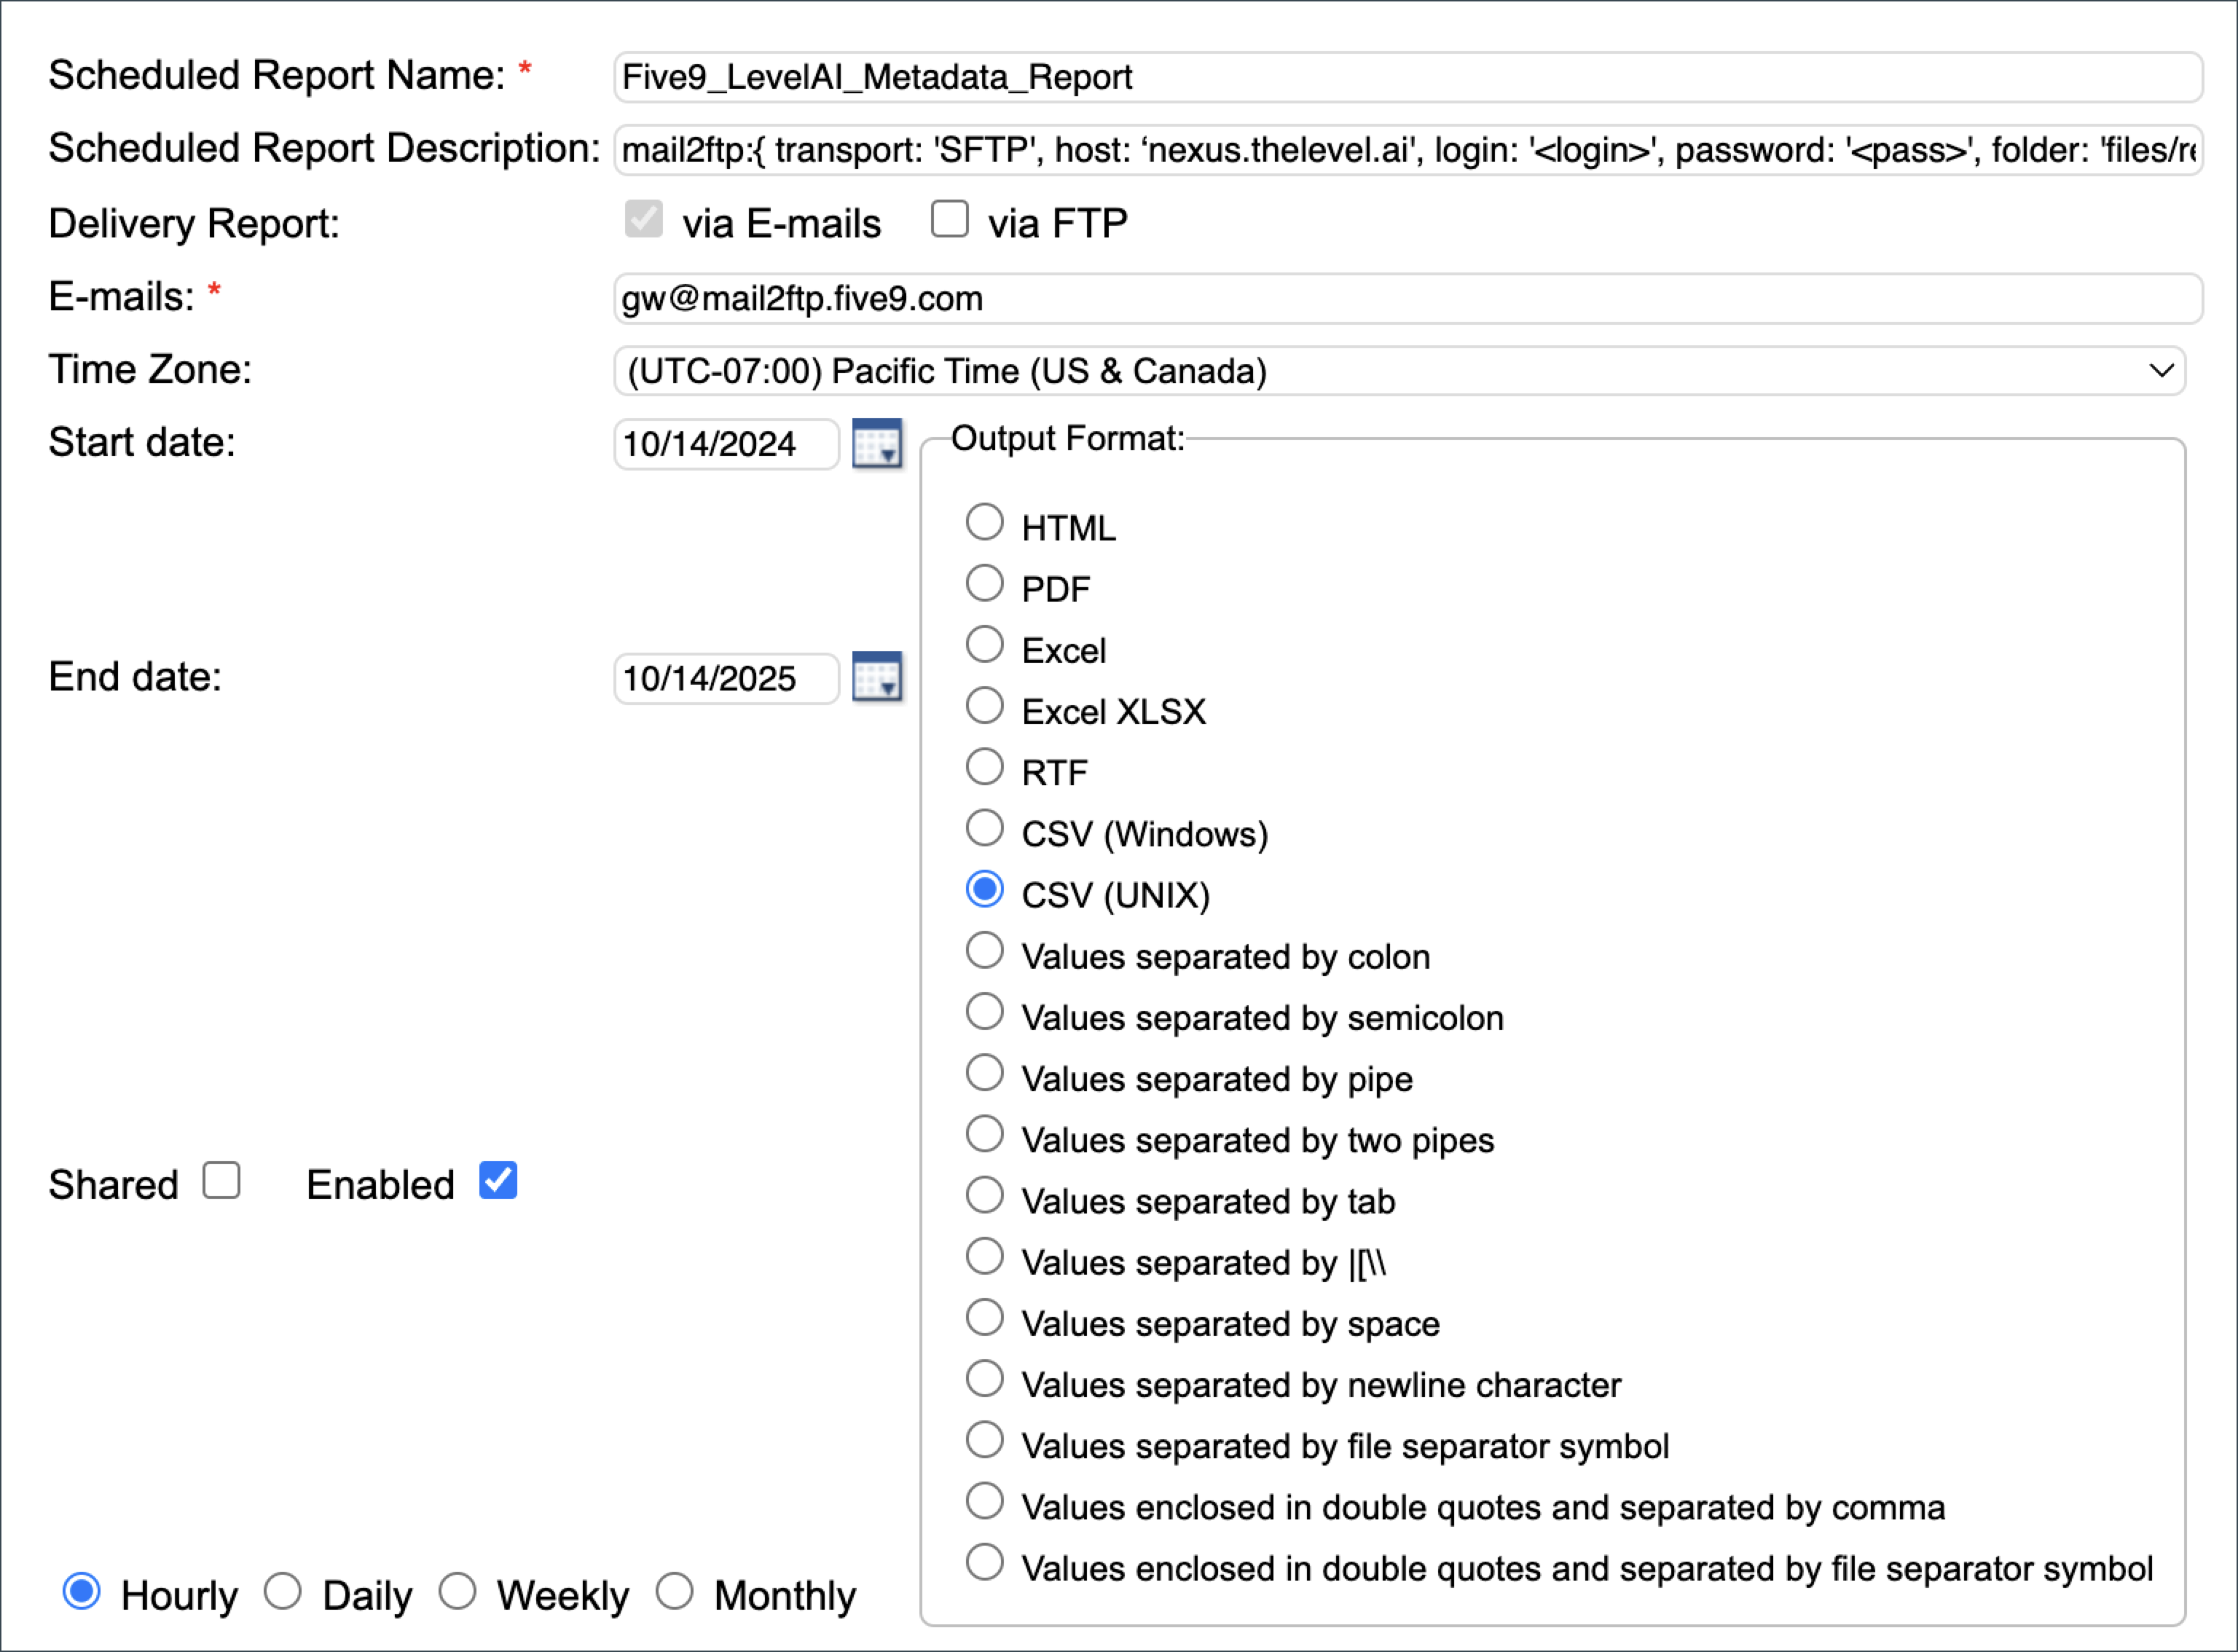
If you would like an even quicker cadence, please inform your Level AI representative. This will require multiple reports (with different Minute triggers) to be set up.
The chosen cadence affects what is selected in Report Options > Time Frame > Interval
- If a metadata report should be run hourly, select Past Hour
- If multiple metadata reports should be run per hour, select This Hour
- If a metadata report should be run once, select the specific date range.