Amazon Connect Contact Center Integration
Last updated: September 3, 2026
Overview
This document outlines the process for integrating your Amazon Connect data with Level AI. The integration process involves 4 distinct phases, each focusing on a specific data type:
1. Call Recordings & Transcripts to S3
- Enable requisite types of call recording in Amazon Connect; configure sending these recordings and transcripts to a designated S3 bucket.
- Purpose: Provides raw audio and text data for analysis.
2. Contact Trace Records (CTRs) to S3
CTRs contain metadata about interactions (e.g. which agent was on a call) and are not the same as call recordings.
- Configure delivery of CTRs to the same S3 bucket.
- Purpose: Maps recordings to agent and interaction metadata for performance analysis
3. Chat Transcripts to S3
- Enable chat logging in Amazon Connect; configure the delivery of chat transcripts to the same S3 bucket.
- Purpose: Adds chat interactions to the analysis.
4. Granting Level AI Access to S3
- Create an IAM role with read-only access to the S3 bucket > Provide Level AI with the IAM role details.
- Purpose: Grants Level AI secure data access.
Essential Information about Amazon Connect
INFO
You can refer to the complete AWS Connect documentation here.
When you create an Amazon Connect instance, a corresponding Amazon S3 bucket is created by default to store data such as contact reports and recordings. This data is encrypted using AWS Key Management Service (AWS KMS). The same bucket and key are used for both recordings and exported reports, but you can configure separate buckets and keys if needed. Refer to the Update instance settings article for instructions on this process.
Default Buckets and Enabled Features:
Call Recordings: When a bucket is created to store call recordings, call recording is automatically enabled at the instance level. To start recording, you'll need to configure recording behavior within a contact flow.
Chat Transcripts: A bucket for chat transcripts enables chat transcription at the instance level, storing all transcripts. If you want to monitor chats, you'll need to set up recording behavior in a contact flow.
Exported Reports: A bucket is created by default for storing exported reports.
Contact Flow Logs: A bucket is created by default for storing contact flow logs.
Live Media Streaming: This feature is not enabled by default.
Even with the default settings, it's crucial to verify your configuration to ensure Level AI can successfully access and analyze your data since your Amazon Connect instance might have custom settings that deviate from the defaults.
Verification Steps:
Verify that the default S3 bucket for your Amazon Connect instance exists.
Confirm that KMS encryption is enabled for the S3 bucket.
Check your contact flows to ensure call recording and chat transcript logging are enabled for the interactions you want to analyze.
Ensure that the IAM roles used by Level AI have the correct read-only permissions for the S3 bucket.
Phase 1: Enabling the flow of Call Recordings to S3 Bucket
Enable call recordings in the contact center. Select Agent and customer.
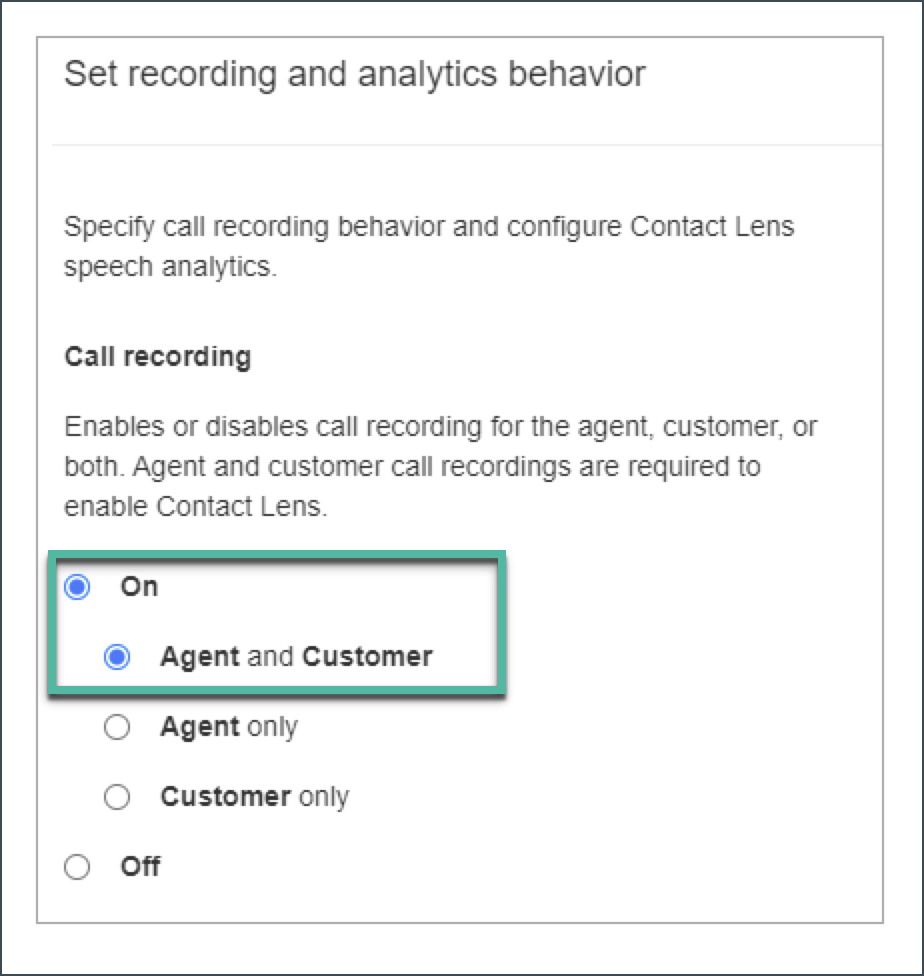
Recordings and transcripts will be automatically stored in the S3 bucket created for the instance.
References
Phase 2: Enabling the flow of Contact Trace Records to S3 Bucket
Step 1) Choosing or Creating an S3 Bucket for CTR Storage
Identify an existing S3 Bucket in which you want to store your Contact Trace Records (CTRs) or create a new bucket. Note the name of the chosen S3 bucket. You'll need it in the later steps.
TIP
You can use the same S3 bucket where you store your call recordings and transcripts, or choose a separate bucket specifically for CTRs.
Step 2) Configuring AWS Glue for CTR Schema Definition
Next, you need to set up AWS Glue Service that points to the S3 Bucket from the earlier Phase 1.
In the AWS Management Console, navigate to the AWS Glue service.
In the Glue menu, under Data catalog > select Databases.
Click Add database. Enter a descriptive name for your database (e.g., "connect_ctr_database"). Optionally, add a location and description.
Click Create Database.
Now, open the database you just created and click Add tables.
Name the table (e.g., "connect_ctr_table"). Confirm the table is assigned to the database you just created.
On the next page, select the S3 bucket you chose in Step 1 as the data source.
For Data format, select Parquet and define the following schema:
| Column Name | Type |
1 | awsaccountid | string |
2 | awscontacttracerecordformatversion | string |
3 | agent | string |
4 | agentconnectionattempts | string |
5 | attributes | string |
6 | channel | string |
7 | connectedtosystemtimestamp | string |
8 | contactid | string |
9 | customerendpoint | string |
10 | disconnecttimestamp | string |
11 | initialcontactid | string |
12 | initiationmethod | string |
13 | initiationtimestamp | string |
14 | instancearn | string |
15 | lastupdatetimestamp | string |
16 | mediastreams | string |
17 | nextcontactid | string |
18 | previouscontactid | string |
19 | queue | string |
20 | recording | string |
21 | systemendpoint | string |
22 | transfercompletedtimestamp | string |
23 | transferredtoendpoint | string |
24 | DisconnectReason | string |
25 | Disconnectdetails | string |
Step 3) Configuring Kinesis Firehose for CTR Delivery from Connect to S3
3A) Creating a new Kinesis stream using Direct PUT
In the Amazon Kinesis dashboard, under Deliver Streams > click Create delivery stream.
Set the source to Direct PUT or other sources and the destination to Amazon S3. Give the source a suitable name.
Disable Data Transformation and enable Record format conversion; select the format Apache Parquet.
Choose the region, database, table, and the latest version of the Glue Service that you set up in Step 2.
Under Destination Settings, choose the bucket you created in Step 1. If isn't autofilled after setting up your Glue service, you might not require need dynamic partitioning. However it is recommended to at least set a bucket error prefix.
Configure buffer/compression/encryption/etc. as needed. For most use cases, the default values should work.
Create or choose an appropriate role for Firehose to access S3 (defaults are usually sufficient but you can modify these values as per your business needs).
Review the final output and create the stream.
3B) Using an Existing Kinesis Stream
If you're already using a Kinesis stream, you will still need to create a Kinesis Firehose. This time, you must point the Source at the existing Stream setup for your Amazon Connect instance.
In the Amazon Kinesis dashboard, under Deliver Streams > click Create delivery stream.
Set the source to Amazon Kinesis Data Streams and the destination to Amazon S3.
In the Source Settings, select your desired existing Kinesis stream that has already been created for Amazon Connect. This will add Firehose as an additional consumer of that stream without altering the existing data flow.
Disable Data Transformation and enable Record format conversion; select the format Apache Parquet.
Choose the region, database, table, and the latest version of the Glue Service that you set up in Step 2.
Under Destination Settings, choose the bucket you created in Step 1. If isn't autofilled after setting up your Glue service, you might not require need dynamic partitioning. However it is recommended to at least set a bucket error prefix.
Configure buffer/compression/encryption/etc. as needed. For most use cases, the default values should work.
Create or choose an appropriate role for Firehose to access S3 (defaults are usually sufficient but you can modify these values as per your business needs).
Review the final output and create the stream.
Step 4) Connecting Amazon Connect to Kinesis Firehose
Now that you have set up all of the services, the only remaining action is configuring Amazon Connect to link all of the services together.
In the Amazon Connect dashboard, navigate to Data streaming.
Click the Enable data streaming checkbox to activate it, if it isn't already active. This will permit you to select options for Contact Trace Records and Agent Events.
Under Contact Trace Records, select Kinesis Firehose.
Next, select the Firehose stream you created in Step 3.
Click Save.
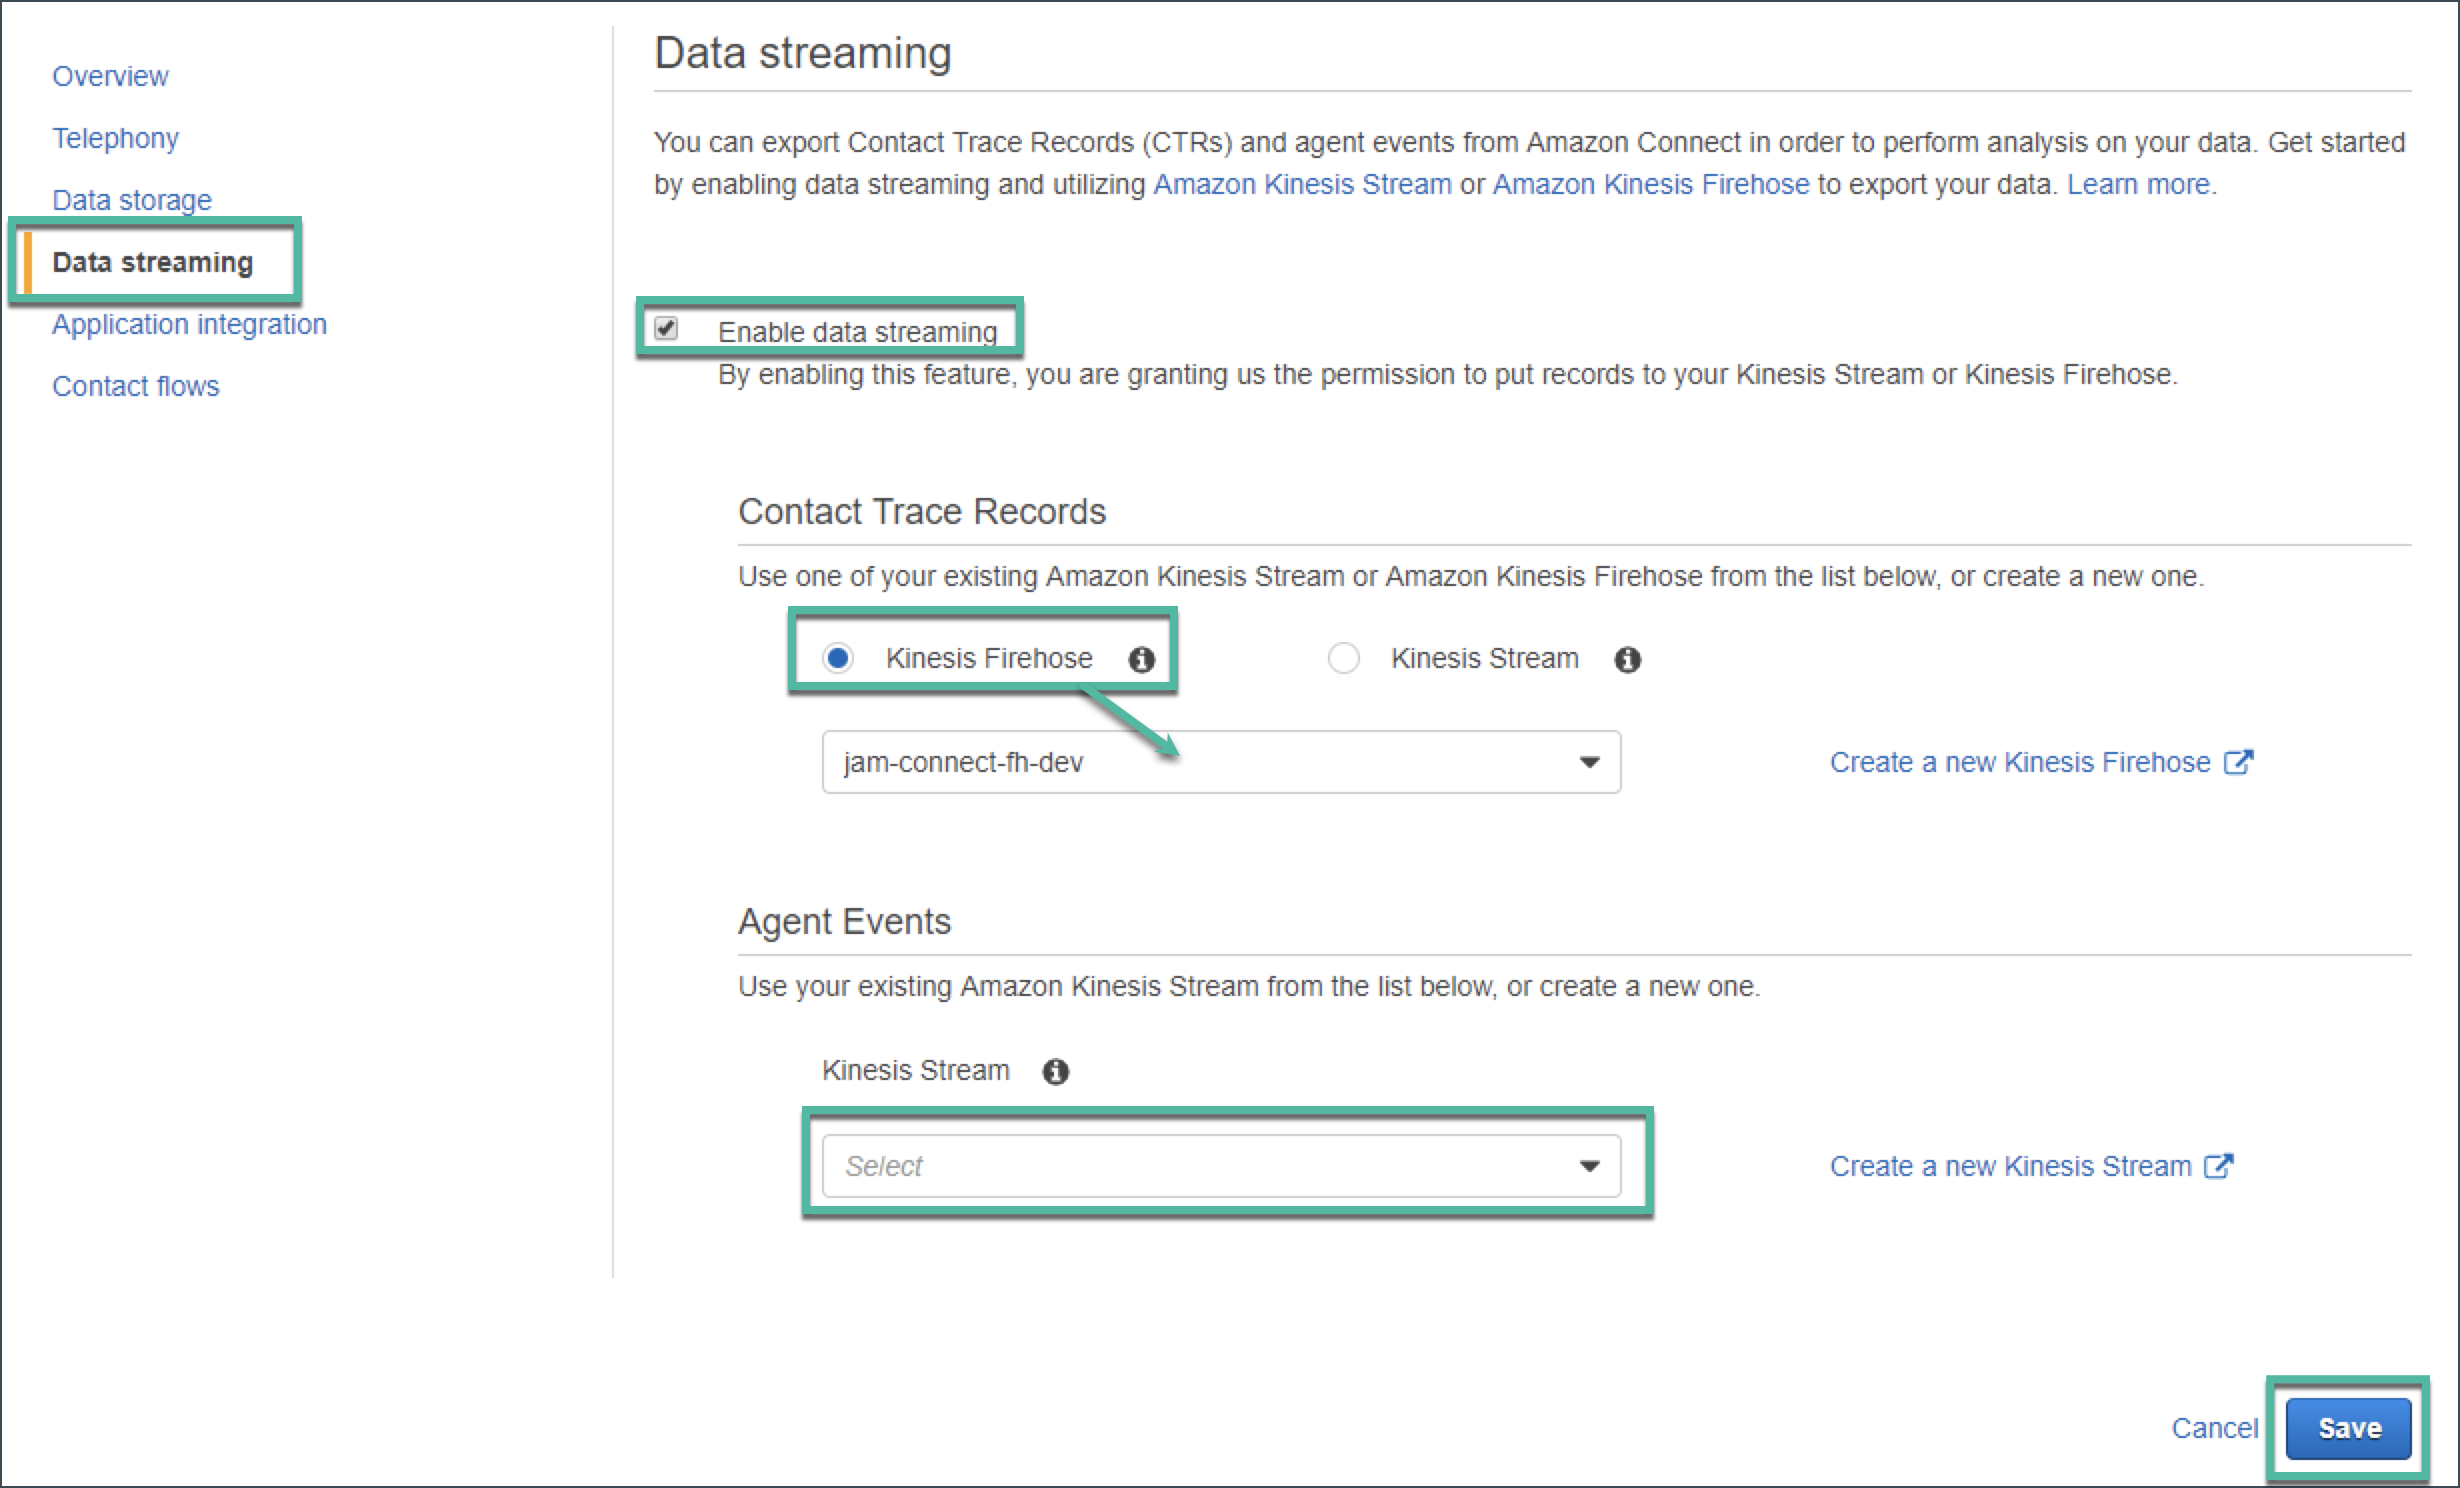
To verify whether the data flows correctly,
Return to the Kinesis Firehose console and select the firehose you created.
Navigate to the Monitoring tab and check whether Delivery To S3 Records field shows data.
If you do not see any metrics despite new data being added, please review and verify whether all permissions in your roles were correctly configured:
- Double-check IAM permissions for Firehose and Glue.
- Verify the Glue schema matches your CTR data structure.
- Ensure the correct Kinesis stream is selected if using an existing stream.
- Verify that data streaming is enabled in your connect instance.
References
Phase 3: Enabling the flow of Chat Logs to S3 Bucket
By following the steps and verifications until this point, your chat logs should be flowing correctly to the same bucket as configured in Phase 1. However, in case you are not leveraging Amazon Connect for voice interactions, you will need to follow a process similar to Phase 1 for your chat logs:
Open your Amazon Connect dashboard.
If you're creating your instance, note down the bucket that the instance generates for data storage; you will require this for granting role access in Phase 4.
Alternatively, navigate to Settings for your Amazon Connect instance and note down the existing bucket being used for storage.
References
Phase 4: Authorizing Level AI for data access
Create a role for Level AI > grant it IAM permissions to access the relevant S3 bucket(s) as described in the preceding phases for Call Recordings, CTRs, and Chat Transcripts. This will enable Level AI to periodically poll and fetch recordings from the server, and run its downstream processing workflows.
The user for Level AI will need both of the following required permissions:
s3:ListBucket
s3:GetObject
References
Phase 5: Setting up the AWS Connect Integration in LevelAI
Documentation: https://level-ai-knowledge-base.help.usepylon.com/articles/1872476018-setting-up-the-aws-connect-integration-in-level-ai
Security and Level AI
Security is top priority for us. End to end security is embedded in all our workflows. Please review our latest security policies, procedures and certifications on our security page.
Level AI satisfies the requirements for HIPAA, SOC 2, and PCI.

INFO
We are happy to address further questions or detailed security review processes. Please reach out to your Account Executive (AE) or email security@thelevel.ai and we will be happy to assist you.